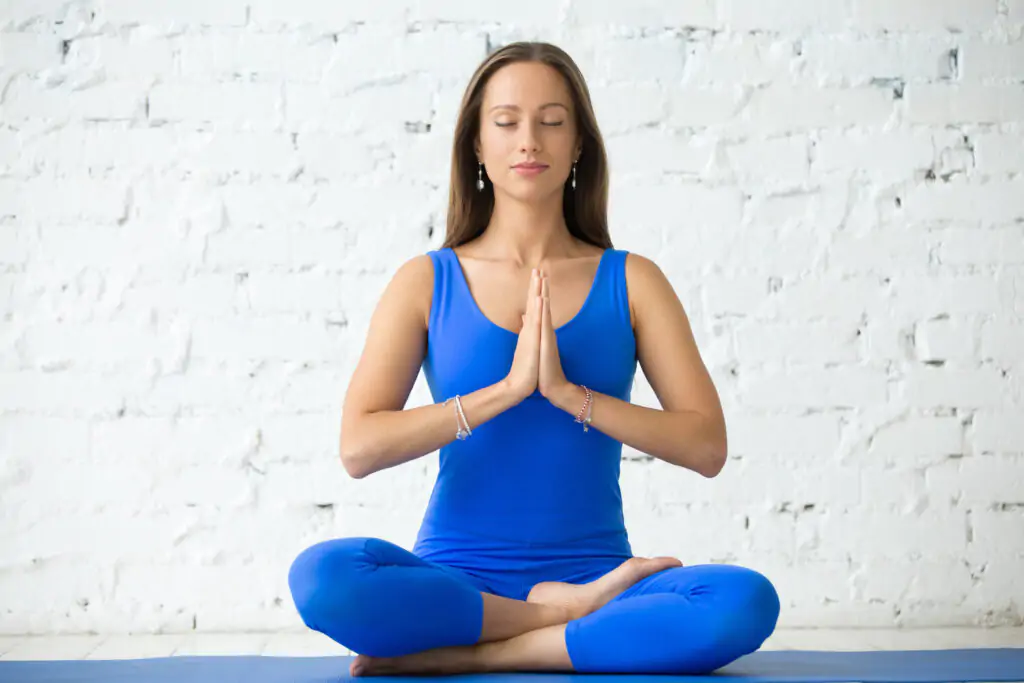
If there is one yoga posture that instantly brings to mind a meditating monk sitting in perfect stillness, it is Padmasana, more commonly known as the Lotus Pose . Rooted in ancient yogic and meditative traditions, Padmasana is far more than just a pretty sitting position — it is a powerful tool for calming the mind, strengthening the body, and deepening your inner awareness.
The word Padmasana comes from Sanskrit: Padma meaning “lotus” and Asana meaning “posture.” Just as the lotus flower blooms beautifully above muddy water, this pose is believed to help practitioners rise above the noise of daily life into a space of clarity and peace. In Chinese and Tibetan Buddhist traditions, it is also called the Vajra position, and it holds a sacred place in Hindu, Jain, and Buddhist meditation practices.
Whether you are a complete beginner stepping onto the mat for the first time or an intermediate practitioner looking to deepen your seated practice, this guide will walk you through everything you need to know about Padmasana — from the step-by-step technique to its remarkable health benefits, practical modifications, and expert tips for building the pose safely.
A Brief History and Cultural Significance
Padmasana is one of the oldest documented yoga postures, with references dating back thousands of years in ancient texts such as the Hatha Yoga Pradipika and the Gheranda Samhita. Depictions of deities and spiritual figures seated in lotus posture appear throughout Indian, Buddhist, and Tibetan iconography, underscoring the posture’s deep spiritual roots.
The lotus is a universal symbol of enlightenment and purity — it grows in murky water yet blooms untouched. In the same spirit, sitting in Padmasana is thought to cultivate an inner state of purity and awareness that is undisturbed by external circumstances.
How to Do Padmasana (Lotus Pose): Step-by-Step Guide
Before attempting full Padmasana, make sure your hips, knees, and ankles are adequately warmed up. Never force yourself into the pose; work with your body, not against it.
What You Need
- A yoga mat or firm, comfortable surface
- A folded blanket or block (optional, for beginners)
Step-by-Step Instructions
- Start seated. Sit on your mat with both legs extended straight in front of you. Lengthen your spine and sit tall.
- Bring the right foot up. Gently bend your right knee and use both hands to cradle the right foot, placing it on top of the left thigh. The sole of the foot should face upward, and the heel should rest close to the lower abdomen.
- Bring the left foot up. Now bend the left knee and slowly bring the left foot on top of the right thigh in the same way — sole facing upward, heel near the abdomen.
- Position your hands. Rest your hands on your knees, palms facing up or down. You can incorporate a mudra here — Chin mudra (index finger and thumb touching), Chinmayi mudra, Adi mudra, or Bhrama mudra each enhance the meditative quality of the pose in different ways.
- Align your posture. Keep your head level, chin slightly tucked, and your spine naturally erect — not rigidly stiff. Allow your shoulders to relax away from your ears.
- Breathe and hold. Close your eyes and breathe deeply and evenly. Hold the posture for as long as is comfortable, gradually increasing the duration with regular practice.
Tip: Alternate which leg goes on top each session to create balanced flexibility on both sides.
Padmasana for Beginners: Modifications and Progressions
Full Padmasana requires significant flexibility in the hips, knees, and ankles. If you are not there yet, do not worry — this is entirely normal, and there is a safe, well-established path to get you there.
Ardha Padmasana (Half Lotus Pose)
Begin with Ardha Padmasana, or Half Lotus. Instead of crossing both legs, simply place one foot on the opposite thigh while the other rests on the floor. This gentler version allows you to build the necessary hip flexibility gradually without putting undue stress on the knee joint.
Practice Half Lotus consistently on both sides before attempting the full version.
Use a Prop
Sitting on a folded blanket or a firm yoga block tilts the pelvis slightly forward, which reduces pressure on the knees and makes it easier to maintain an upright spine. This small adjustment can make a world of difference, especially for those with tighter hips.
Try Virasana as Preparation
Among the best preparatory poses for Lotus is Virasana (Hero’s Pose). Virasana stretches the thighs, opens the knees, and prepares the ankles for the demands of full Lotus. Sit between your heels with your spine tall, using a block under the seat if needed. It is worth noting that for some practitioners, Virasana is actually more challenging than Lotus itself — so approach it with the same mindful patience.
Preparatory and Follow-Up Poses
Poses to Practice Before Padmasana
Warming up with these Seated Poses will open the hips, stretch the inner thighs, and mobilize the ankle joints:
- Badhakonasana (Butterfly Pose) — opens the inner groin and hip flexors
- Ardha Matsyendrasana (Half Spinal Twist) — mobilizes the hip joint and spine
- Janu Shirasasana (Head-to-Knee Forward Bend) — stretches the hamstrings and outer hip
Each of these poses directly addresses the areas of the body most engaged in Padmasana, making them invaluable warm-ups.
Pose to Practice After Padmasana
Once you have completed your seated practice and meditation in Lotus, transition into Adho Mukha Svanasana (Downward Facing Dog). This counter-pose gently lengthens the legs, releases the hip flexors, and decompresses the spine after the deep inward folding of Lotus.
Health Benefits of Padmasana
The benefits of regular Padmasana practice extend well beyond sitting still. Here is a closer look at what this ancient posture can do for your body and mind:
1. Calms the Nervous System and Reduces Stress
When you sit in Padmasana and focus on slow, rhythmic breathing, the body’s parasympathetic nervous system is activated. This “rest and digest” response lowers cortisol levels, eases anxiety, and creates a profound sense of mental calm. Padmasana is widely regarded as one of the most effective Meditation Position for deepening mindfulness practice.
2. Improves Digestion
The cross-legged position applies gentle compression to the lower abdominal region, which is thought to stimulate digestive organs and improve bowel function. Many practitioners report relief from bloating and sluggish digestion with consistent seated practice.
3. Reduces Muscular Tension and Supports Blood Pressure
Sitting in Padmasana with conscious breathing helps release deep muscular tension, particularly in the hips, lower back, and shoulders. Over time, this contributes to better circulatory efficiency and can help bring blood pressure into a healthier range.
4. Opens and Strengthens the Hip Complex
The external rotation required to sit in Lotus stretches the piriformis, psoas, and inner groin muscles. Over time, this creates remarkable hip mobility, which in turn supports better posture, easier walking, and reduced lower back discomfort.
5. Supports Women During Pregnancy and Menstruation
With appropriate guidance, Padmasana is considered beneficial during pregnancy, as the open hip position can ease pelvic tension. It is also associated with reducing menstrual cramps and discomfort, likely due to improved circulation in the pelvic region.
6. Enhances Focus and Cognitive Clarity
The stable, grounded nature of the posture physically signals the brain to settle. Many meditators find that Padmasana helps them sustain concentration far longer than other positions. This connection between the body’s stillness and the mind’s clarity is one of the most celebrated aspects of this ancient pose.
7. Cultivates Postural Awareness
Unlike slouching on a chair, sitting in Padmasana requires active engagement of the spinal muscles. Over time, this builds a natural, healthy upright posture that carries over into daily life.
Benefits at a Glance
| Benefit | Area of Impact |
|---|---|
| Calms the mind | Mental / Neurological |
| Improves digestion | Digestive System |
| Reduces blood pressure | Cardiovascular |
| Opens hips and groin | Musculoskeletal |
| Eases menstrual discomfort | Reproductive Health |
| Enhances focus | Cognitive / Mindfulness |
| Builds postural strength | Spine and Core |
5 Expert Tips for Building Your Lotus Pose Safely
Many practitioners have injured themselves by rushing into the full posture before their body was ready. Here are five key principles to build Lotus without risking your joints:
- Warm up every single time. Never move straight into Lotus from a cold body. Dedicate at least 10–15 minutes to hip openers and gentle joint mobilization first.
- Let the rotation come from the hip, not the knee. The knee is a hinge joint — it is not designed for significant rotation. If you feel pressure or discomfort in the knee rather than a stretch in the hip, come out of the pose immediately.
- Breathe as your guide. If your breath becomes choppy, strained, or shallow at any point in the posture, treat that as your body’s signal to back off. Smooth, even breathing means you are in the right place; effortful breathing means you have gone too far.
- Progress through stages. Move from Easy Pose (Sukhasana) → Half Lotus (Ardha Padmasana) → Full Lotus (Padmasana). Do not skip stages simply because you are eager to progress.
- Consistency beats intensity. Ten minutes of gentle hip-opening practice every day will take you further than one forceful attempt per week. Patience is the real key to Lotus.
Contraindications: Who Should Avoid Padmasana?
While Padmasana offers tremendous benefits, it is not suitable for everyone. Avoid or modify this pose if you have:
- Ankle or knee injuries — The demands on these joints are significant. Practice only under the supervision of an experienced yoga teacher if recovering from injury.
- Severe hip tightness — Forcing the posture can strain the ligaments of the knee. Work with preparatory poses until sufficient hip mobility is established.
- Recent surgeries — Anyone recovering from hip, knee, or ankle surgery should obtain medical clearance before attempting Lotus.
Note on Knee Pain: If you experience any sharp, pinching, or persistent discomfort around the knee joint while attempting Padmasana, stop immediately and consult both a yoga teacher and a healthcare professional. The sensation in Lotus should be a deep muscular stretch, never joint pain.
Mudras to Deepen Your Practice
Incorporating hand gestures (mudras) while sitting in Padmasana can enhance the meditative experience significantly. Each mudra channels energy differently:
- Chin Mudra — Index finger and thumb touching; promotes clarity and concentration
- Chinmayi Mudra — Three fingers curled with thumb and index touching; said to deepen awareness
- Adi Mudra — Thumb tucked inside a closed fist; calming and grounding
- Bhrama Mudra — Fists resting on thighs; balances the energy in all directions
Breathe slowly and mindfully for several minutes in your chosen mudra to experience its effect on your state of mind.
Building a Practice Around Padmasana
Padmasana is most rewarding when placed within a consistent daily routine. Here is a simple framework:
Morning Practice (15–20 minutes):
- 5 minutes of joint warm-up (ankle circles, hip rotations)
- 5 minutes in Badhakonasana or Janu Shirasasana
- 5–10 minutes in Ardha or Full Padmasana with mindful breathing or meditation
- Transition to Downward Dog to close
Evening Wind-Down (10 minutes): Simply sitting in Half Lotus with slow, deep breathing for 10 minutes before bed can significantly improve sleep quality and reduce the mental residue of a busy day.
Frequently Asked Questions (FAQ)
Yes, but beginners should start with Half Lotus (Ardha Padmasana) rather than the full posture. Consistent practice of preparatory hip-opening poses over several weeks will gradually build the flexibility needed for full Lotus. Never force the knees down.
Begin with just 1–3 minutes and increase the duration gradually over weeks and months. Many experienced meditators sit in Lotus for 20–30 minutes or longer. The key is comfort — the posture should support your meditation, not distract from it.
In the early stages of pregnancy and with appropriate modifications, many women find Padmasana comfortable and beneficial. However, always consult your doctor and work with a qualified prenatal yoga instructor before practicing.
Knee discomfort in Lotus almost always signals that the rotation is coming from the knee rather than the hip joint. Back off to Half Lotus, focus on hip-opening preparatory poses, and never push through joint pain. The stretch should be felt in the hip and inner thigh — not the knee.
Sukhasana (Easy Pose) is a simple cross-legged sitting posture where both feet rest on the floor beneath the opposite shin. Padmasana is more advanced — both feet are placed on top of the opposite thighs. Sukhasana is an excellent starting point for those working toward Lotus.
Conclusion: Your Invitation to Bloom
Padmasana is more than a yoga posture — it is an invitation to grow inward. Like the lotus flower that rises gracefully from muddy waters, regular practice of this timeless pose can help you cultivate stillness, physical well-being, and a deeper connection to yourself.
The journey to full Lotus is not measured in days or weeks — for many, it unfolds over months and years of patient, consistent practice. And that journey itself is the reward. Each session on the mat builds not only hip flexibility but also the mental qualities of patience, self-acceptance, and presence.
Start where you are. Honor your body. And let the lotus bloom in its own time.
Explore more – Seated Poses to complement your Lotus practice, or dive deeper ino tips for making Padmasana your perfect Meditation Position. Have questions or want to share your experience? Leave a comment below — we would love to hear from you!