HATH YOGA ESSENTIALS: MASTERING ALIGNMENT AND BALANCE WITH PROPS
Welcome to our comprehensive guide to Hatha Yoga Essentials: Mastering Alignment and Balance with Props. Dive into the world of Hatha Yoga as we explore a variety of foundational poses, from Tadasana to Salamba Sarvangasana, with a focus on proper alignment and the use of props. Whether you’re a beginner or an experienced yogi, join us on this transformative journey to deepen your practice and enhance your understanding of yoga.
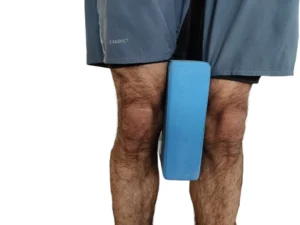
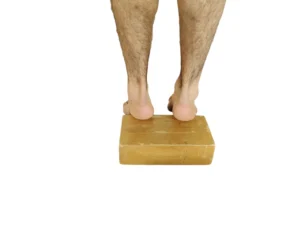
1.Tadasana mountain pose
Props required for Tadasana (Mountain Pose) include a belt and a block. The belt should be wrapped around the upper chest, and then both sides of the belt can be either pulled down with the hands or pressed with the heels. This action helps in opening the chest and adjusting the position of the shoulders.
For alignment, focus on grounding through the feet while lifting the kneecaps upward by using a block under the heels and engaging the quadriceps. If the knees and quadriceps are engaged, place the block between both knees. If there’s any discomfort in the lower back, position the block between the groin. For muscle-related issues, opt for a folded blanket or soft block, while for bone or hip problems, a harder block is more suitable. Additionally, ensure that the shoulders are kept away from the ears and the chin gently tucked.

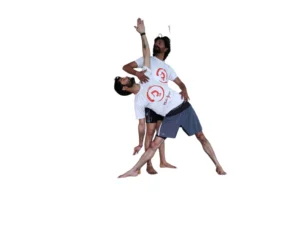
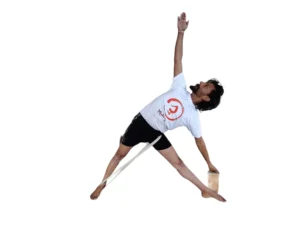
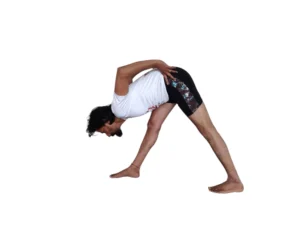
2.Trikonasana
The Sanskrit name for Triangle pose is Trikonasana.
For Trikonasana, props such as a belt, block, stool, or wall ropes can be beneficial. It’s advisable to observe various pictures to understand the posture better.
To utilize the props effectively, loop the belt from the back foot to the crease of the front thigh. Apply pressure with the bottom hand onto the block to provide support for the arm and facilitate the opening of the chest.
Extend the trunk from the side by pressing the psoas muscle with the foot .
Open the chest by pushing the upper shoulder back .
Regarding alignment, ensure to firmly press the outer edge of the back foot into the mat. Bend from the crease of the front thigh while maintaining parallel sides of the torso. Explore the space behind you to encourage the opening of the chest, and keep the upper hand engaged. Gaze towards the thumb, unless there are concerns about the neck, in which case looking downwards is recommended.
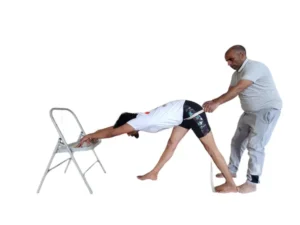
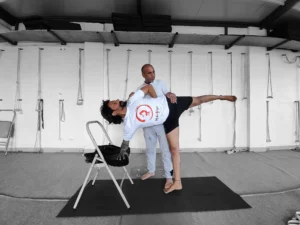
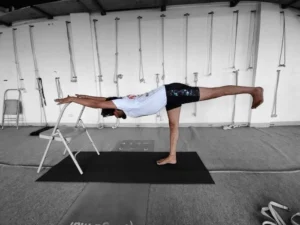
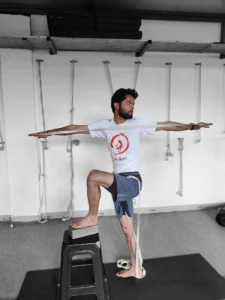
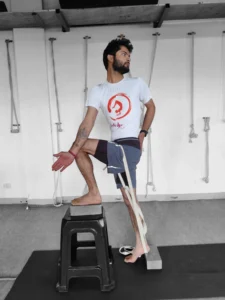
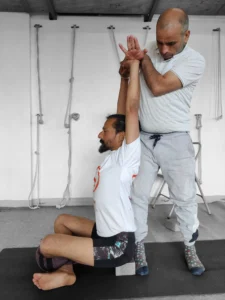
5.Virabhadrasana III
Also known as Warrior III Pose, can be practiced with the support of a chair or a Trestler To effectively use the chair as a prop, press your forearms into the back of the chair. Alternatively, you can hold onto the bar at the back of the chair or a trestler .
Maintain proper alignment by grounding through the bottom foot and ensuring dorsiflexion in the upper foot. Lengthen through the crown of the head and in the opposite direction through the center of the upper heel. Keep the hips square throughout the pose.
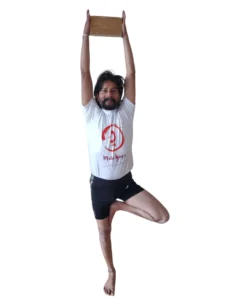
6. Vrksana
Vrksasana, commonly known as Tree Pose, can benefit from the use of props such as two soft blocks, one hard block, and a wall.
To properly position the props, place one soft block to support the hip and the other to support the bent knee against the wall, both set at minimal height. Hold the hard block between open palms.
Maintain proper alignment by grounding through the bottom foot, ensuring the hips are squared, andMaintain proper alignment by grounding through the bottom foot, ensuring the hips are squared, and squared, and guiding the shoulders down and back.
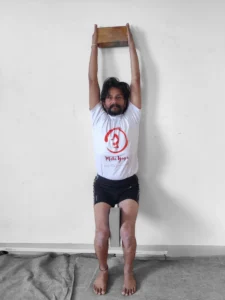

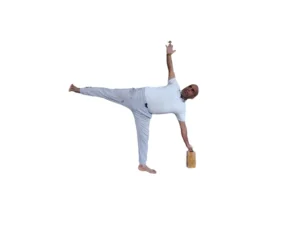
8. Parivritta utkatasana
Parivrtta Utkatasana, also called Revolved Chair Pose, can be supported with the use of a block and a wall.
To incorporate the props effectively, ensure your sit bones are supported against the wall. Place the block on the outside of the foot, and as you twist, place your hand on the block.
Maintain proper alignment by keeping the knees directly over the ankles, lengthening the spine, and ensuring the arms are in a straight line. Reach up with one arm while pressing the other into the block to facilitate the twist and open the chest.
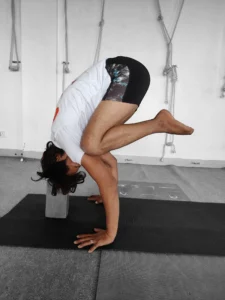
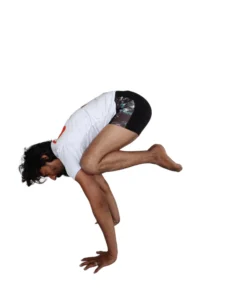
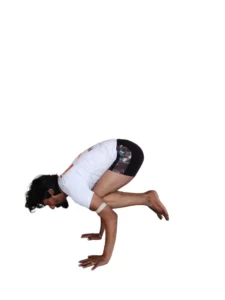
9. Bakasana
Bakasana, known as Crow Pose, can benefit from the use of a block.
To effectively incorporate the prop, place the block under your forehead at its maximum height.
Ensure proper alignment by pressing your palms firmly into the mat, utilizing the Mula Bandha to lift yourself higher, and bringing your feet close to your buttocks.
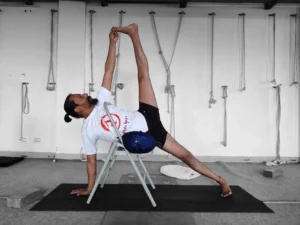
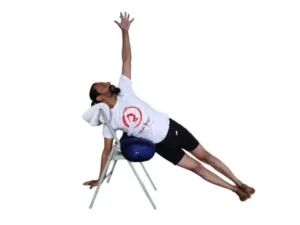
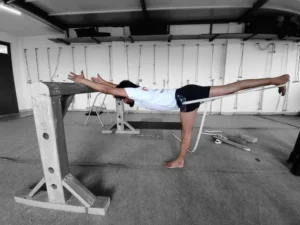
10. Vasisthasana
Aso known as Side Plank Pose, can be practiced with the support of a chair, blanket, and block.
To properly position the props, place the bolster across the chair’s seat. For additional height, a folded blanket may be added on top of the bolster. Another blanket can be folded over the back bar of the chair. Additionally, place the block at the required height behind the chair.
Maintain proper alignment by pressing the outer edge of the bottom foot into the mat and keeping both feet together and active in dorsiflexion. Rest the side of the trunk on the bolster and support the neck by resting it over the blanket on the back bar. Press the bottom hand into the block, extend the upper arm, and keep the upper hand active. Gaze towards the thumb of the upper hand to complete the pose.
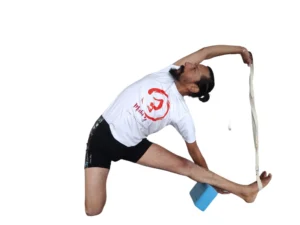
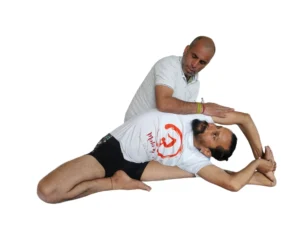
11- Kneeling Asana Parighasana
For this asana you’ll need a belt and a wall.
To utilize the props effectively, kneel sideways against the wall and press your hip and thigh into it. Loop the belt over the ball of the foot of your extended leg, and then grab the end of the belt with your upper hand.
Focus on alignment by continuously pressing the hip into the wall and actively stretching the extended leg. Ensure your foot remains in active dorsiflexion. Open your chest by lifting through the upper shoulder and keeping both shoulders away from the ears. Gaze upwards to complete the pose.
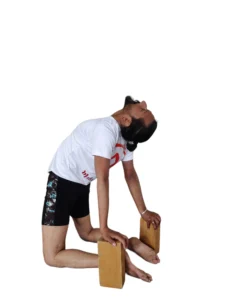
12 – Ustrasana
Also known as Camel Pose, you can use two blocks and a wall as props.
To set up the props, kneel against the wall and position the blocks on the outside of both ankles.
Focus on alignment by pressing your hips and thighs into the wall. As you bend backward, ensure to engage the lumbar, thoracic, and cervical parts of the spine. Create space between the pubic bone and the navel, the navel and the diaphragm, the diaphragm and lower ribs, and the lower ribs and clavicles. Press your hands firmly into the blocks to support the pose.
13- Sukhasana
Also known as Easy Pose, you may use a block.
To utilize the prop effectively, position the sit bones on top of the block.
Focus on alignment by grounding through the sit bones and crossing the shin bones. Ensure the ankles are directly below your knees. Lengthen the spine and keep the shoulders down and back. Gently tuck the chin and maintain a passive gaze ahead.
14- Gomukhasana
Also known as Cow Face Pose, you may utilize a block and a belt.
To properly position the props, sit on the block and hold the belt with both hands behind your back.
Ensure proper alignment by grounding through the sit bones and lengthening the spine. Spread the collarbones and open the chest. Extend the upper elbow further back and behind the head, while sending the lower elbow towards the midline of the body and up the back.
15- Bharadvajasana
You can utilize two blocks and a belt as props.
To position the props effectively, place one block under the buttock on the side you are twisting towards. Then, place the other block on the outside of the thigh.
Focus on alignment by evening out the hips and maintaining the trunk perpendicular to the ground. Lengthen the spine through the crown of the head. Use the back hand to enhance the twist by gently walking the fingers further along the belt, and send the back shoulder even further back.
16- Parivrtta Upavishta Konasana
For this asana you’ll need a block and a belt as props.
To use the props effectively, place the block under your foot and loop the belt over the foot and the block. Then, grab the end of the belt behind your back. Extend your other arm to grasp the belt close to the foot.
Focus on alignment by grounding through the sit bones and evenly distributing the weight between them. Keep both feet actively dorsiflexed, lifting the kneecaps and engaging the quadriceps. Open the chest by drawing the shoulder back, and ensure both shoulders remain away from the ears.
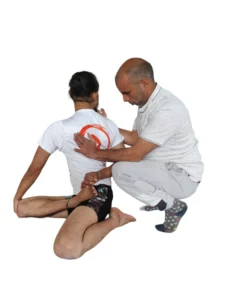
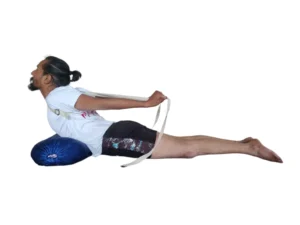
17 – Parivrtta Janu Sirsasana
For this asana you’ll need a block and a belt as props.
To utilize the props effectively, loop the belt and tighten it over the foot of the extended leg. Then, grab the belt behind your back. Place the block in front of your knee at a suitable height and rest the other arm on the block.
Focus on alignment by keeping the foot of the extended leg actively dorsiflexed. Press the foot of the bent leg into the other thigh. Use the belt behind you to further open up the chest and deepen the twist.
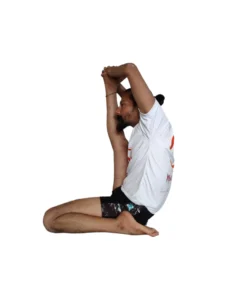
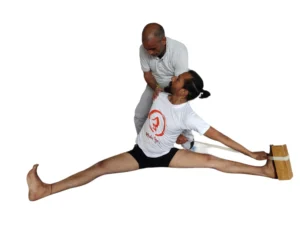
18 – Krounchasana
For this you’ll require a belt as a prop.
To properly position the prop, place the belt on the ball of the foot and hold both ends securely.
Focus on alignment by ensuring the hips are level and the spine is lengthened. Extend the elbows outward to maintain an open chest, and guide the scapulae down the back while keeping the shoulders away from the ears. Press the knee of the bent leg firmly into the mat.

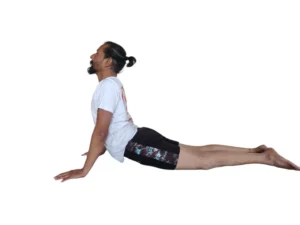
19 – Bhujangasana
You can use a bolster and a chair as props.
Position the props by placing the bolster in front of the chair. Rest your lower ribs on the bolster and place your elbows on the seat of the chair.
Focus on alignment by ensuring the hips and thighs maintain firm contact with the mat throughout. Keep the feet together, or hip-width apart if experiencing back problems. Press the tops of the feet into the mat and relax the glutes. Press the elbows firmly into the chair seat, look slightly upward, and draw the scapulae down the back.
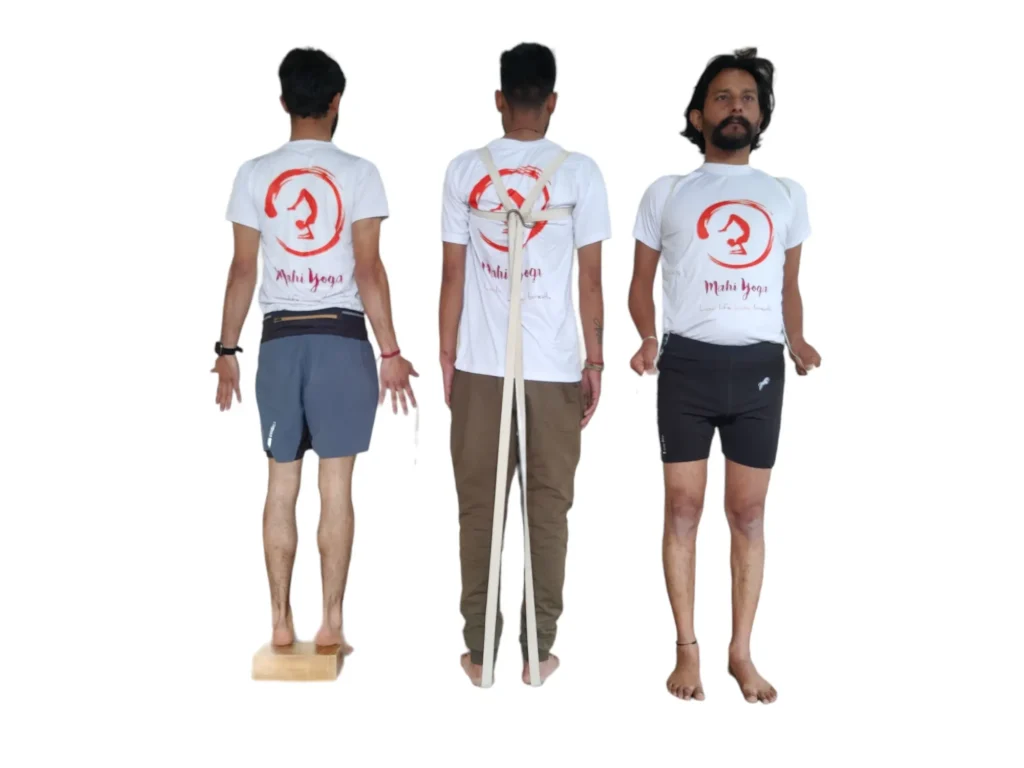
20. Salabhasana
For this you can utilize a bolster and two belts as props.
Prepare the props by looping the two belts together. Position the belt across the back, under the armpits, and cross the two ends on the back. Hold both ends of the belt and gently and evenly pull back and down.Focus on alignment by ensuring the hips and thighs maintain constant firm contact with the mat. Keep the feet together, or hip-width apart if experiencing back problems. Press the tops of the feet into the mat and relax the glutes. Send the scapulae down the back, shoulders away from the ears, and open the chest.
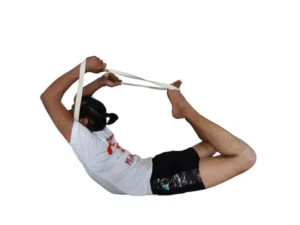
21. Dhanurasana
For this asana you’ll need a bolster as a prop.
Position the prop by resting your hips and lower abdomen on the bolster.
Focus on alignment by holding the outside of the ankles and pressing them into the hands. Send the shoulders away from the ears to maintain proper form.
21. Dhanurasana
For this asana you’ll need a bolster as a prop.
Position the prop by resting your hips and lower abdomen on the bolster.
Focus on alignment by holding the outside of the ankles and pressing them into the hands. Send the shoulders away from the ears to maintain proper form.

22. Supta Dandasana
For this asana you’ll need a block as a prop.
Position the block over your feet.
Focus on alignment by ensuring the entire back remains in contact with the mat. Allow the arms to rest alongside the trunk, pressing the hands gently into the mat. Keep the feet actively engaged in dorsiflexion, actively involving the hamstrings and the Achilles tendon.
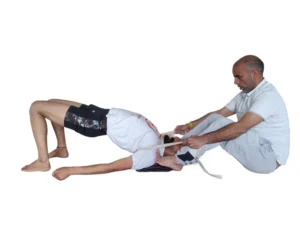
23. Setu Bandha Sarvangasana
For this asana you’ll need a block as a prop.
Position the block under your sacrum, placing it at its highest height widthwise.
Focus on alignment by pressing your feet firmly into the mat. Roll your shoulders under and press your hands into the mat.
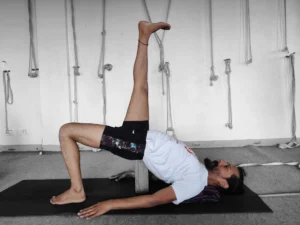
24. Eka Pada Setu Bandha Sarvangasana
For this asana you’ll need a block as a prop.
Position the block under your sacrum, placing it at its highest height widthwise.
Focus on alignment by pressing your bottom foot firmly into the mat. Extend the upper leg with the foot actively in plantar flexion. Ensure the hips are even, and roll the shoulders under while pressing the hands into the mat.

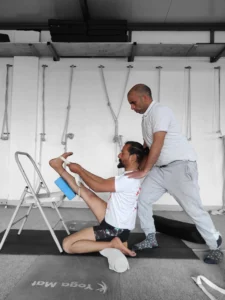
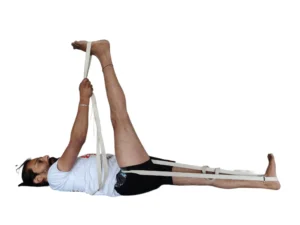
25. Supta Pada Angusthasana
I, for this asana you’ll need a belt and a wall as props.
Position one foot against the wall while the other foot presses into the looped belt. Hold the ends of the belt with both hands.
Focus on alignment by ensuring the hips are even and both legs remain engaged. Allow the scapulae to rest on the mat and open the chest. Keep the shoulders away from the ears as you send the heel of the extended leg up towards the ceiling. Point the toes towards you to complete the pose.
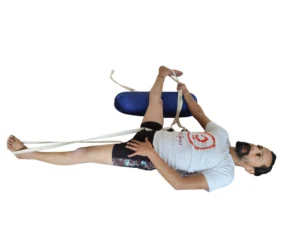
26. Supta Pada Angusthasana
II, prepare a belt and use a wall as props.
Place one foot against the wall and the other foot in the looped belt, holding the ends of the belt in one hand.
Focus on alignment by opening one leg out towards the floor and utilizing the belt to bring it closer to your face. Ensure the hips remain level throughout the pose. Press down on the hip of the leg extended towards the wall while keeping the entire back in contact with the mat.
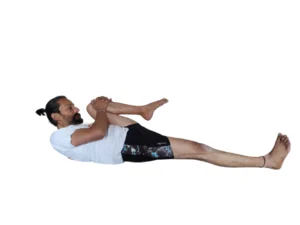
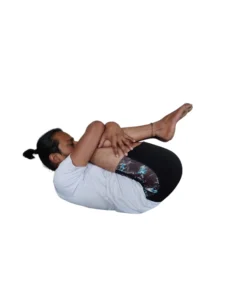
27. Pawanmuktasana
For this asana you’ll need a belt as a prop.
Position the belt over the balls of the feet and hold it on the outside of the feet. Then, gently pull the belt.
Focus on alignment by bringing the thighs towards the abdomen and allowing the sacrum to rest on the mat. Bring the forehead towards the knees to complete the pose.

28. Viparita Karani
For this asana you’ll need a block as a prop.
Position the block so that the sacrum rests on its shorter edge, placed widthwise at its maximum height.
Focus on alignment by rolling the shoulders under and pressing the hands into the mat. Engage the legs and keep the feet in plantar flexion throughout the pose.
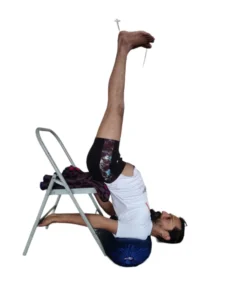
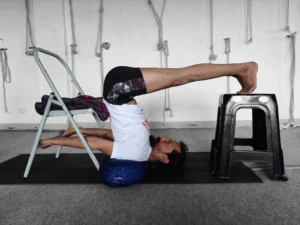
29. Salamba Sarvangasana, for this asana you’ll need a chair and a bolster as props.
Position yourself by sitting on the chair with your legs bent over the back bar. Recline while holding onto the side bars. Allow the tops of your shoulders to meet the bolster, releasing the head and neck. Extend your legs upward and push the hips forward.
Focus on alignment by creating a vertical line in the body, with the hips directly over the shoulders and the feet stacked above the hips. Allow the bodyweight to rest on the tops of the shoulders, ensuring there is no pressure on the neck. Hold onto the sides of the chair for support.
30. Halasana
For this asana you’ll need a chair as a prop.
Position the chair above your head, adjusting the distance as needed based on your body.
Focus on alignment by rolling the shoulders under and pressing the outer edges of the interlaced hands into the mat. Lift up through the sit bones to maintain a long spine. Allow the weight to be carried by the shoulders while pressing the tops of the feet into the seat of the chair.
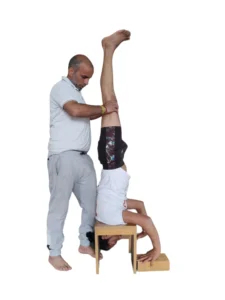
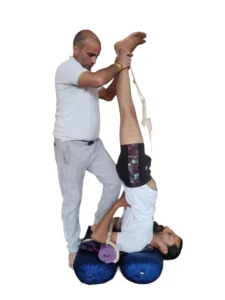
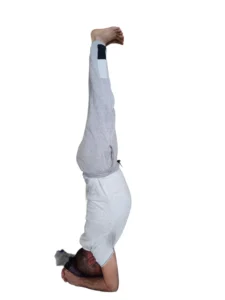
31. Mukta Hasta Sirsasana
For this asana you’ll require two hard blocks and six soft blocks as props.
Arrange the props by creating two columns, beginning with a hard block in each and stacking the other blocks on top of each other. Adjust the distance of the blocks from the wall so that your shoulders rest comfortably in the middle.
Focus on alignment by placing your hands in front of the blocks with elbows at a 90-degree angle. Avoid pressing the crown of the head into the mat. Instead, press the shoulders into the blocks. Engage your abdomen and maintain the feet in plantar flexion throughout the pose.
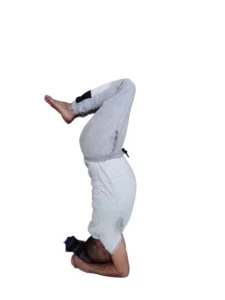
32. Niralamba Sirsasana, for this asana you’ll need two hard blocks and six soft blocks as props.
Arrange the props by creating two columns, starting with a hard block in each and stacking the other blocks on top, ensuring your shoulders rest comfortably in the middle. Adjust the distance from the wall as needed.
Focus on alignment by avoiding pressing the crown of the head into the mat. Instead, press the shoulders into the blocks and engage the abdomen. Extend the arms away to the sides and maintain the feet in plantar flexion throughout the pose.
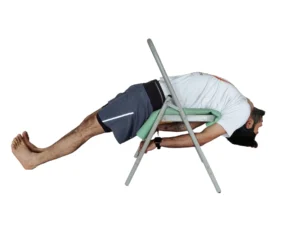
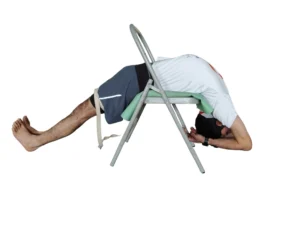
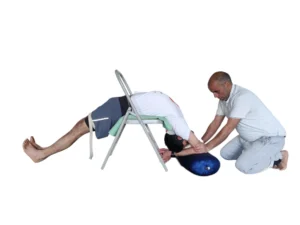
34. Viparita Dandasana
while lying on the back on a chair:
- Setup: Begin by positioning a chair lengthwise on your mat. Sit at the edge of the chair facing away from the backrest. Ensure the chair is stable and won’t move during the practice.
- Lie Back: Slowly recline back onto the chair, allowing your upper back and shoulders to rest comfortably on the seat. Your head should be supported by the backrest, and your legs should extend straight out in front of you.
- Adjustment: Slide your hips towards the edge of the chair, so your sacrum is supported by the seat while your legs extend freely off the chair.
- Leg Position: Extend your legs fully, keeping them together and active. Point your toes towards the ceiling to engage your leg muscles.
- Arm Position: Rest your arms comfortably by your sides with your palms facing up. Allow your shoulders to relax and sink into the support of the chair.
- Breathing: Close your eyes and take deep, slow breaths. Allow your body to relax into the support of the chair, feeling the gentle opening in your chest and abdomen with each inhale and exhale.
- Alignment: Ensure your spine is lengthened and your chest is open. Your hips should be in line with your shoulders, and your legs should be fully extended and active.
- Hold: Stay in the pose for a few minutes, focusing on your breath and allowing your body to surrender to the support of the chair.
- Release: To come out of the pose, gently bend your knees and place your feet flat on the ground. Use your hands for support as you slowly sit up and return to a seated position on the chair.
- Rest: Take a moment to rest and observe any sensations in your body. You may want to remain seated on the chair for a few breaths before continuing with your practice or daily activities.
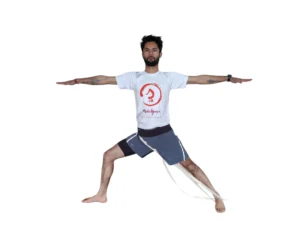
35. Here are the instructions for practicing Warrior 2 pose with a belt looped around the back foot to the front groin:
- Starting Position: Begin standing at the top of your mat in Tadasana (Mountain Pose). Take a step back with your left foot, about 3 to 4 feet apart, and turn your left foot out approximately 45 to 90 degrees.
- Loop the Belt: Take a yoga belt and loop it around the ball of your back foot (left foot in this case), bringing the other end of the belt around your body towards the front groin area.
- Arms and Torso: Extend your arms out to the sides parallel to the ground, with palms facing down. Keep your shoulders relaxed and away from your ears. Engage your core muscles to support your spine.
- Alignment: Check your alignment – your front heel should align with the arch of your back foot. Your front knee should be bent at a 90-degree angle, directly over your ankle. Your back leg should be straight and strong.
- Hips and Torso: Square your hips towards the side of your mat, opening up your hips and chest towards the long edge of the mat. Your torso should be directly facing the side of your mat.
- Gaze: Soften your gaze over your front middle finger. Keep your neck aligned with your spine, neither straining nor dropping it.
- Engagement: Press down firmly through the outer edge of your back foot and the inner edge of your front foot. Engage your thigh muscles to lift your kneecaps and stabilize your legs.
- Breathing: Take deep, smooth breaths as you hold the pose, feeling the strength and stability in your legs and the expansiveness in your chest.
- Hold: Hold Warrior 2 pose for several breaths, feeling grounded and strong in your stance.
- Release: To release the pose, gently release the tension in your arms and legs. Step your feet back together at the top of your mat, returning to Tadasana.
- Switch Sides: Repeat the pose on the other side by stepping back with your right foot and looping the belt around the ball of your right foot to the front groin.
Practicing Warrior 2 pose with a belt looped around the back foot to the front groin can help enhance stability, alignment, and focus in the pose. Remember to breathe deeply, honor your body’s limits, and enjoy the experience of embodying strength and grace.