
Key Highlights
- Wrist pain in a yoga practice often comes from repeated load in weight-bearing yoga poses.
- Proper alignment helps reduce wrist strain, especially in Plank, Downward Dog, and arm balances.
- Spreading the fingers and using the entire hand can improve pressure control.
- Warm-ups, gradual strength work, and smart progressions support safer wrists.
- Yoga props and pose changes can make common yoga poses easier on sensitive joints.
- Persistent wrist pain should not be ignored during practice.
Introduction
Wrist pain can turn a helpful yoga practice into a frustrating one, especially when yoga poses ask your hands to carry more load than they are ready for. This is common in Vinyasa and other active styles that use planks, push-ups, and transitions often. The good news is that you can lower your risk with better setup, smarter progress, and a few simple adjustments. If your wrists feel sore or strained, these tips can help you practice with more comfort and control.
10 Tips to Prevent Yoga Wrist Pain and Strain Safely
Many cases of wrist strain in yoga happen when the hands take more body weight than they can manage with good form. Fast transitions, repeated push-up actions, and extended wrists in common yoga poses can all add up over time. That is why injury prevention starts before pain becomes a bigger issue.
You do not need to avoid yoga poses completely. Instead, you can improve hand placement, build strength gradually, and use helpful modifications when needed. The next ten tips show practical ways to reduce wrist pain and make weight-bearing postures safer.
1. Distribute Weight Evenly Through Hands and Fingers
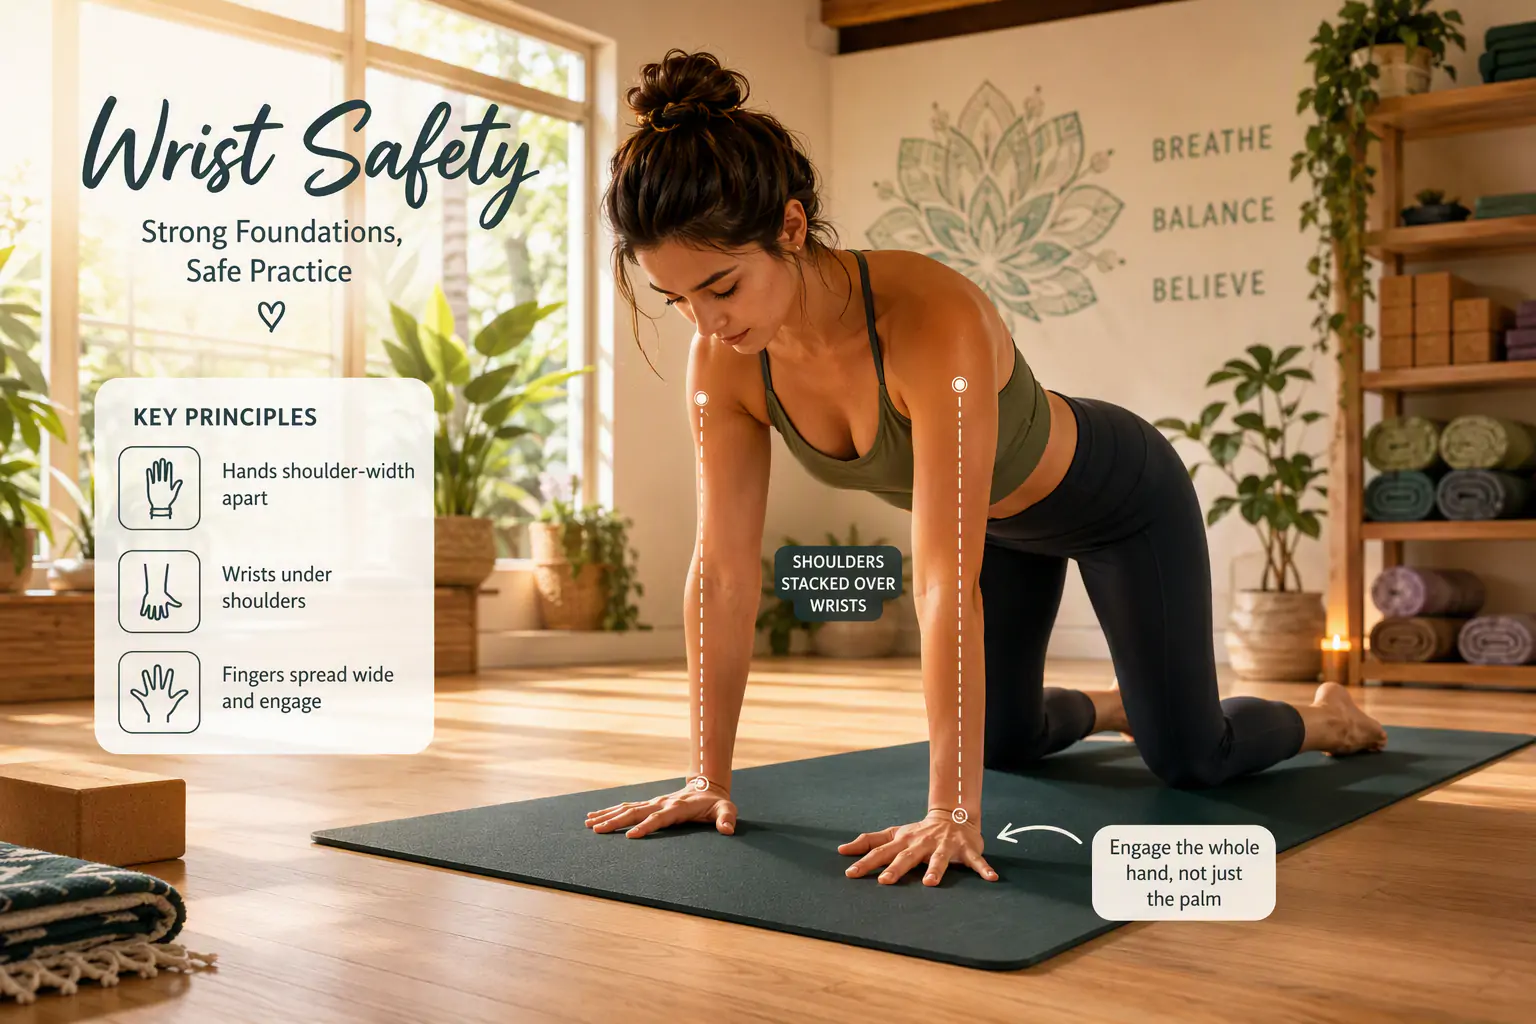
One of the most effective ways to lower wrist pain is to stop dumping your body weight into the heel of the hand. In poses like downward dog, many people press mostly into the base of the palm. That creates a lot of stress in a small area and can lead to wrist discomfort.
Instead, think about using the entire hand. Press through the fingertips, the base of the fingers, and the knuckles of the index finger so the load spreads out better. This may feel unusual at first, but it helps your hands support you with more control.
- Spread your fingers wide without bending them.
- Press evenly through the entire hand, not just the heel of the palm.
- Ground the thumb and the knuckles of the index finger.
- Lightly grip the floor to respond to small weight shifts.
2. Focus on Proper Wrist Alignment in Poses
Yes, incorrect alignment in yoga postures can lead to wrist strain. When the wrist stays in deep wrist extension while the rest of the body collapses forward, soft tissue takes on more load than it should. That is common in Plank, Chaturanga-style actions, and hand balancing work.
A better approach is to seek correct alignment through the whole upper body. Keep the hands placed clearly, organize the shoulders well, and avoid leaning away from your center. If your shoulder blades and chest are not supporting the pose, the wrists often end up doing extra work.
You can also reduce pressure by aiming for a more neutral position whenever possible outside weight-bearing work. During practice, move slowly into loaded poses and check whether your shoulders are stacked well. Small corrections in setup often make a big difference in comfort.
3. Use Modifications for Common Wrist-Intensive Yoga Poses
If you have sensitive wrists, modifications can help you stay active without forcing a painful shape. Many common yoga poses can be adjusted so your wrists do not carry the same amount of pressure. This is useful when you are sore, returning after a wrist injury, or still building tolerance.
For example, if downward facing dog feels too intense, try dolphin pose instead. That keeps the benefits for the shoulders and core while removing hand loading. In other poses, using fists instead of flat palms can also reduce how much wrist extension you need.
A few practical modifications include:
- Replace downward facing dog with dolphin pose.
- Use forearm plank instead of a full plank on the hands.
- Choose restorative or gentler options instead of repeated wrist-heavy flows.
4. Incorporate Wrist-Friendly Yoga Props
Yes, yoga props can reduce wrist pressure and make practice more manageable. They are especially useful if you have wrist pain, tight joints, or a condition such as carpal tunnel. Props help you reach the floor more easily and can decrease how far the wrist has to bend.
One simple option is support under the heel of the palm. A folded mat or blanket under that area, while the fingers stay unsupported, creates a slight angle change. That means you do not move as deeply into wrist extension, which can feel much better for sensitive hands.
Helpful yoga props include:
- Yoga blocks to bring the floor closer.
- A folded blanket or mat under the heel of the palm.
- Supportive setups that keep the wrist closer to a neutral position.
5. Warm Up and Stretch Your Wrists Before Practice
Before placing full weight on your hands, take time to warm up. This simple step is often skipped, yet it matters a lot for wrist joints. A good warm up prepares the tissues for stress, reduces wrist discomfort, and can make your first weight-bearing pose feel less abrupt.
It also supports lubrication of joints, relaxes nearby muscles, and improves local blood flow. If you are older or have a history of wrist issues, this step becomes even more important. The classical sun salutation is described as a helpful way to prepare both the body and the wrists.
| Warm-Up Method | How It Helps |
|---|---|
| Gentle wrist preparation before loading | Gets the hands ready before taking full weight |
| Classical sun salutation | Warms the whole body and eases you toward hand support |
| Gradual move into weight-bearing | Reduces sudden stress on the wrist joints |
6. Strengthen Supporting Muscles Around the Wrists
Healthy wrists need more than flexibility. They also need strength in the supporting muscles around the joint. When those muscles are balanced, the risk of sprain, strain, and overload goes down. This matters in any yoga practice that includes planks, arm balances, or repeated transitions.
A simple way to build this capacity is through slow, controlled work rather than forceful repetition. Easy crow pose is described as a helpful way to improve both strength and flexibility in the wrists. The key is moving gradually, not chasing a full expression too soon.
Do not forget the larger system, either. Core muscles and other large muscle groups help keep your weight from dropping too far into the hands. When the center of the body works well, the wrists do not have to manage so much wrist extension on their own.
7. Take Breaks and Rest When Necessary
Mild soreness does not always mean you must stop everything, but you do need to be careful. If discomfort shows up during a yoga class, reduce the load right away. Taking rest before irritation builds into wrist strain is one of the smartest choices you can make.
A short pause in child’s pose can help when repeated planks, push-ups, or transitions start to feel too demanding. You can also skip a vinyasa, slow the pace, or choose a forearm-based version of the next posture. There is no rule that says every transition must be done exactly the same way.
Still, persistent pain is different from ordinary effort. If pain becomes sharp, keeps getting worse, or does not settle with rest, stop loading the wrist. Continuing through that kind of signal can make recovery harder and may point to a more serious problem.
8. Listen to Your Body and Adjust Intensity
Wrist pain during yoga often comes from overload. Common reasons include too much pressure in extended wrists, quick transitions, poor hand placement, and sudden increases in intensity. Limited strength in the upper body can also push more demand into the lower joints than they are ready to handle.
That is why it helps to listen to your body instead of pushing through every challenge. If a pose causes wrist discomfort, lower the intensity. You might shorten the hold, reduce the number of repetitions, or choose a simpler version that still supports your practice.
Over-enthusiasm is a frequent cause of problems, especially for beginners who want to perform full poses right away. Give your wrists time to adapt. Slowing down is not losing progress. In many cases, it is exactly what allows steady, pain-aware improvement.
9. Gradually Build Up Weight-Bearing Poses
Your wrists are not used to carrying full body weight in daily life, so they need an adjustment period. This is why gradual progress is one of the most effective tips for preventing wrist pain during yoga practice. Tissues respond better when load increases step by step.
Be especially careful with weight-bearing poses that appear often in a yoga class, such as planks, push-ups, and vinyasa transitions. Jump backs, crow pose, and handstand pose ask for even more from the hands and wrists. Rushing into these shapes can create overload before strength and control are ready.
A smarter path is to build tolerance over time. Start with shorter holds, fewer repetitions, and easier variations. As your hands, forearms, shoulders, and core become stronger, your body weight will feel easier to manage without forcing the wrists to do all the work.
10. Seek Professional Guidance for Persistent Wrist Pain
Sometimes the best choice is to stop and get help. If wrist pain becomes sharp, keeps worsening, includes swelling or numbness, or lasts beyond a short period, you should pause weight-bearing yoga. Persistent pain is a sign that simple self-adjustments may not be enough.
This matters even more if you have a history of wrist issues, arthritis, carpal tunnel syndrome, or a recent injury. In those cases, professional guidance can help you understand what is safe and which movements should be limited while healing. Guessing can keep the irritation going.
You can also talk with experienced yoga teachers so they can help modify your setup and choose more suitable poses. A gentler sequence, a restorative approach, or a modified Hatha Yoga session may let you stay involved without adding extra strain.
Conclusion
In summary, preventing wrist pain and strain during yoga is essential for an enjoyable practice. By implementing the tips discussed—such as distributing weight evenly, maintaining proper alignment, using modifications, and listening to your body—you can significantly reduce the risk of injury. Remember that your wrists are vital for a variety of poses, so nurturing them with care will enhance your overall yoga experience. If you have persistent wrist issues or need personalized advice, don’t hesitate to seek professional guidance. Taking these steps will not only protect your wrists but also allow you to focus on deepening your practice without discomfort. For more tailored tips, feel free to reach out and get a free consultation with our experts!
Frequently Asked Questions
What causes wrist pain during yoga and how can I prevent it?
The most common causes of wrist pain in yoga poses are poor weight distribution, too much body weight collapsing into the hands, fast transitions, and weak support from the rest of the body. To prevent wrist strain, warm up first, use proper alignment, and spread pressure through the whole hand.
How can I modify yoga poses if I have sensitive or injured wrists?
If you have sensitive wrists, use modifications that reduce load and wrist extension. Try forearm plank instead of a full plank, switch Downward Dog to dolphin pose, or use yoga props like blocks or folded support under the palms. These changes can ease wrist discomfort while keeping you active.
When should I stop practicing yoga due to wrist pain?
Stop during a yoga class if pain is sharp, worsening, or paired with swelling, numbness, weakness, or night pain. Persistent pain may point to a wrist injury, carpal tunnel syndrome, or another condition that needs professional guidance. Rest first, then seek medical advice if symptoms continue.