
There is something quietly transformative about turning your world upside down — quite literally. The yoga headstand, known in Sanskrit as Shirshasana, has been called the King of Asanas for centuries, and once you experience it for yourself, you will understand why. It strengthens the body, sharpens focus, and carries a feeling of accomplishment that few other poses can match.
But here is the honest truth: most people do it wrong. They kick up too fast, skip the foundational steps, or rest too much weight on their neck. The result? Frustration, wobbling, or worse, injury.
This guide covers how to do a headstand the right way — including 10 essential things every practitioner, beginner or intermediate, needs to know before going upside down. Whether you are brand new to inversions or simply looking to refine your technique, you will find everything you need right here.
What Is a Headstand in Yoga?
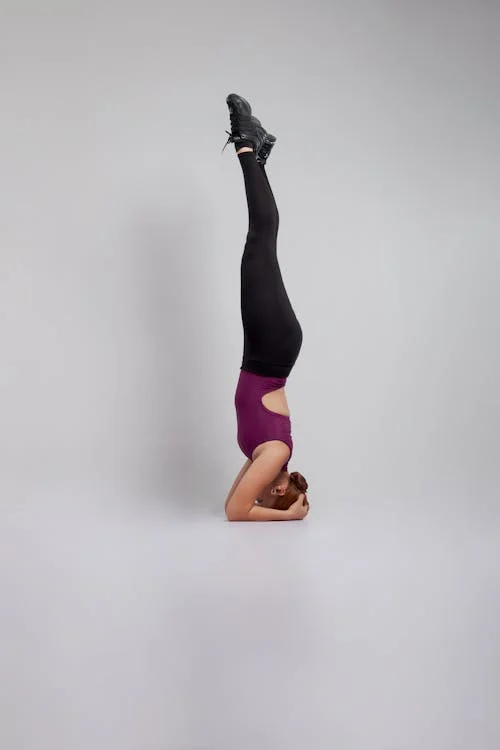
The full name is Salamba Shirshasana, meaning “supported headstand.” In this pose, the body is completely inverted — legs pointing toward the ceiling, forearms grounded on the mat, and the top of the head lightly touching the floor. The arms and shoulders bear most of the weight, not the neck.
Understanding the anatomy of this pose is critical. When done with proper form, the cervical spine stays neutral, the shoulder girdle is engaged and stable, and the core acts as a pillar of support holding everything upright. When done incorrectly, the neck absorbs far too much load.
Key Benefits of Practicing Headstand
| Benefit Area | What It Does |
| Strength | Builds core, shoulder, arm, and spinal stability |
| Circulation | Encourages lymphatic drainage and improved blood flow |
| Mental Clarity | Calms the nervous system and sharpens focus |
| Endocrine Health | Stimulates the pituitary and pineal glands |
| Confidence | Builds mental resilience and overcomes fear of falling |
How to Do Headstand: 10 Things You Need to Know
1. Build Your Foundation Before You Go Upside Down
The headstand is not a beginner’s first-day pose. It demands real upper body and core strength. If you cannot hold a Downward-Facing Dog or a Dolphin Pose comfortably for at least a minute, your body is not yet ready to bear your full weight on your forearms and head.
Spend several weeks strengthening your shoulders, arms, and abs before attempting the pose. Dolphin Push-Ups — moving between forearm plank and forearm downward dog — are one of the single best preparatory exercises you can do.
2. Set Up Your Elbow Distance Correctly
Most people get this wrong immediately. To find the right elbow width, place one hand at the crease of the opposite elbow. The distance between your elbow and fingertips is exactly how far apart your elbows should be on the mat.
Why does this matter? Elbows placed too wide rob you of shoulder stability and force the neck to compensate. Getting this right from the start will make every future attempt more controlled and far safer.
3. Interlace Your Fingers and Cup Your Head — Not Cradle It
Once your elbows are placed, interlace your fingers firmly and create a cupped basket with your palms. The back of your head rests gently inside this cup — but you should not be leaning your skull backward into your hands and taking pressure off the top of the head.
The crown of your head (not the forehead, not the back of the skull) is the contact point with the mat. If you feel pressure shifting to your neck during practice, your head position needs adjustment. This is a critical piece of the anatomy of the pose.
4. Start in Child’s Pose to Neutralize Blood Pressure
Before entering the headstand, spend about 10 to 15 seconds in Shashankasana — Child’s Pose. This simple step does something important: it helps equalize blood pressure between the upper and lower body, priming your circulatory system for the inversion that follows.
Skipping this step and going straight into the pose from standing is a common shortcut that many practitioners regret. The transition matters just as much as the destination.
5. Never Kick Up — Press Up Instead
Kicking up into a headstand is the single most dangerous habit in the practice. When you kick, you surrender control and rely entirely on momentum. If that momentum carries you too far, the neck takes a sudden, heavy load with no time to stabilize.
Instead, work toward pressing up. Walk your feet in close until your hips are stacked above your shoulders, tuck both knees to your chest, and then slowly extend upward. This requires more core strength — which is exactly the point. The core strength that lets you press up is the same strength that will keep you balanced and safe once you arrive at the top.
6. Let Your Arms Do Most of the Work
The name says headstand, but the reality is that your forearms are your true foundation. At least 80 percent of your body weight should travel through your arms and into the mat. Your head makes contact with the floor, but it does not bear the load.
Think of it this way: if someone slipped a sheet of paper under your head mid-pose, you should be able to pull it free without toppling over. That level of arm engagement is what you are working toward. Press the forearms down actively and lift through the shoulders — this upward shoulder push is what keeps the neck long and decompressed.
7. Engage Your Core — Constantly
Your core is the control center of the headstand. Without it, the legs drift, the lower back compresses, and the whole structure begins to fall apart. From the moment your feet leave the ground to the moment they return, your abdominals should be switched on.
Draw the navel gently toward the spine, activate the hip flexors, and keep the legs together and pressing actively upward. Many beginners make the mistake of going limp once they find the balance. Active muscles are what make the pose feel effortless — not passive stillness.
8. Know How Long to Hold and When to Come Down
Beginners should start with just 5 to 10 seconds and gradually build to 30 seconds, then a minute, over several weeks. Experienced practitioners may hold the pose for up to 3 minutes, but longer does not always mean better — quality of hold matters far more than duration.
Come down the same way you went up: with control. Bend the knees slowly to the chest, lower both feet to the floor together. Do not collapse down. Then rest immediately in Child’s Pose for at least 10 deep breaths before continuing your practice. This is especially important for those who also practice Shoulderstand, as the sequence of inversions requires careful recovery between poses.
9. Know the Contraindications — Not Everyone Should Practice
Headstand is a powerful pose, and that power comes with clear cautions. The following people should avoid it or consult a medical professional first:
- Anyone with neck injuries, herniated discs, or cervical spine issues
- Those with high blood pressure, glaucoma, or detached retina
- People who experience chronic migraines or frequent dizziness
- Pregnant individuals, due to fall risk and pressure changes
- Children under the age of seven, whose skulls are not yet fully hardened
- Those with active ear infections or sinus congestion
If you experience wrist pain in your regular yoga practice, note that forearm-based headstands actually place very little strain on the wrists — this can make it more accessible than arm-based poses for some practitioners.
10. Bust the Myths That Are Holding You Back
Many people never attempt the headstand because of persistent myths. Let’s set the record straight:
| Common Myth | The Truth |
| Headstands damage the neck | Incorrect form damages the neck. Proper technique protects it. |
| Menstruation means no inversions | This is debated. Many practitioners continue comfortably — listen to your body. |
| You need a wall to practice safely | A wall can help beginners, but relying on it long-term prevents real progress. |
| It only works if you hold it for minutes | Even 10 seconds of quality headstand builds strength and delivers benefits. |
Step-by-Step: How to Get Into Headstand
- Begin in Child’s Pose for 10–15 seconds to neutralize blood pressure.
- Come onto all fours and place your forearms on the mat, elbows shoulder-width apart (measure using the elbow-to-fingertip method).
- Interlace your fingers firmly, pressing the outer edges of your hands into the mat.
- Place the crown of your head on the mat inside the cupped basket of your palms.
- Tuck your toes and walk your feet in toward your head until your hips stack above your shoulders.
- Slowly draw both knees into your chest. Pause here and stabilize before moving further.
- Extend your legs upward with control. Keep your core engaged and legs active throughout.
- Hold for 5–30 seconds (based on your level), breathing steadily and maintaining shoulder engagement.
- Lower your legs by reversing the sequence — knees in, feet down — with full control.
- Rest in Child’s Pose for at least 10 breaths before continuing your practice.
Practical Tips for Faster Progress
- Practice Dolphin Pose daily to build the shoulder endurance needed for headstand.
- Work on headstand at the start of your practice when your body is fresh, not fatigued.
- Use a folded blanket under your head for extra padding on hard floors.
- Ask a qualified teacher to spot you — feedback from an expert accelerates progress dramatically.
- If you fall, practice a controlled forward roll: tuck your chin to your chest and roll forward safely.
- Be patient. Most practitioners take 4–8 weeks of consistent practice before finding their balance in the air.
Frequently Asked Questions (FAQ)
It depends on your starting strength and consistency. Most beginners see significant progress within 4 to 8 weeks of daily practice. Building shoulder and core strength first will shorten this timeline considerably.
Yes, with proper instruction and progression. Never attempt a headstand cold or without building preparatory strength. Learning from a certified yoga teacher is the safest path, especially in your first attempts.
Poor technique — especially placing too much weight on the neck or kicking up uncontrolled — is the main cause of neck issues. When done with proper forearm engagement and correct head placement, the neck is well protected.
In Headstand the body is fully vertical with the crown of the head on the ground. In Shoulderstand, the upper back and shoulders form the base, with the hands supporting the lower back. Shoulderstand is generally considered gentler and is often practiced after headstand in traditional Hatha sequences.
Yes — many advanced practitioners do. For beginners, every other day allows recovery time and prevents overuse of the neck and shoulder muscles. Once your form is solid and your strength is established, daily practice is perfectly appropriate.
Conclusion
The headstand is not just a physical feat — it is a practice in patience, body awareness, and trust. Done well, it is one of the most rewarding postures in all of yoga, delivering genuine strength gains, mental clarity, and an unmistakable feeling of accomplishment every single time you come down safely.
The key is respecting the process. Build your strength, master the entry, keep your arms engaged, and never sacrifice form for the sake of getting up quickly. Every detail in this guide exists to help you practice safely and effectively.
Whether you are just starting out or working to refine a headstand you have been doing for years, there is always more to explore. Read our guides on inversions, study the anatomy behind the pose, and consider pairing your headstand practice with Shoulderstand for a complete and balanced inversion sequence.
Have you tried headstand yet? Share your experience in the comments below — and if this guide helped you, pass it on to a fellow yogi who is working on their inversions! 🙏