Welcome to The Mahi yoga sanctuary!
Yin Yoga offers a gentle yet profound practice that targets the connective tissues, promoting flexibility, relaxation, and a deeper sense of inner peace.
Here, I will guide you through the 25 essential Yin Yoga poses, that we teach here on 100hour Yin Yoga Teacher Training at Mahi Yoga, complete with instructions, benefits, and tips to enhance your practice.
Remember to listen to your body and know your limitations. A yin yoga practice should be helpful not harmful, and always seek medical advice before beginning any new practice if you have pre-existing medical conditions
1. Melting Heart Pose (Anahatasana)
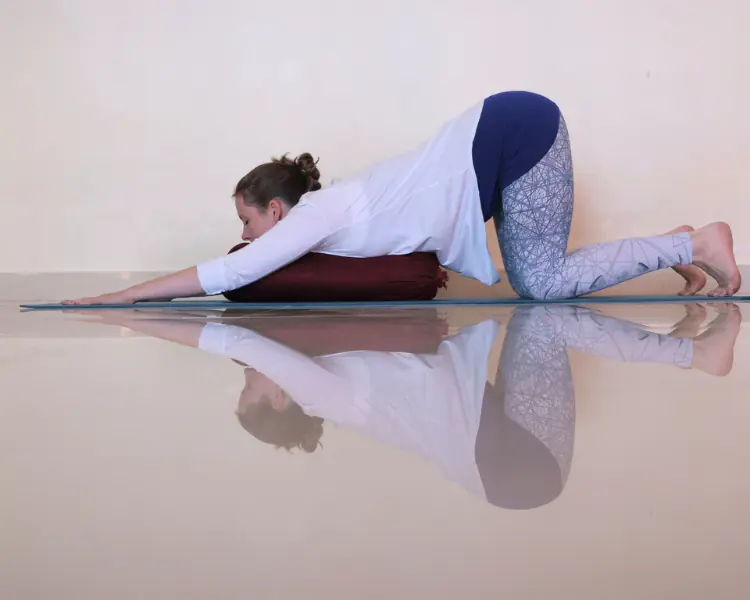
Instructions: Start on all fours. Walk your hands forward, lowering your chest towards the mat while keeping your hips above your knees. Rest your forehead or chin on the mat. You can place a bolster under the chest if you want.
Hold: 3-5 minutes.
Benefits: Stretches the spine and shoulders, opens the heart.
2. Ankle Stretch
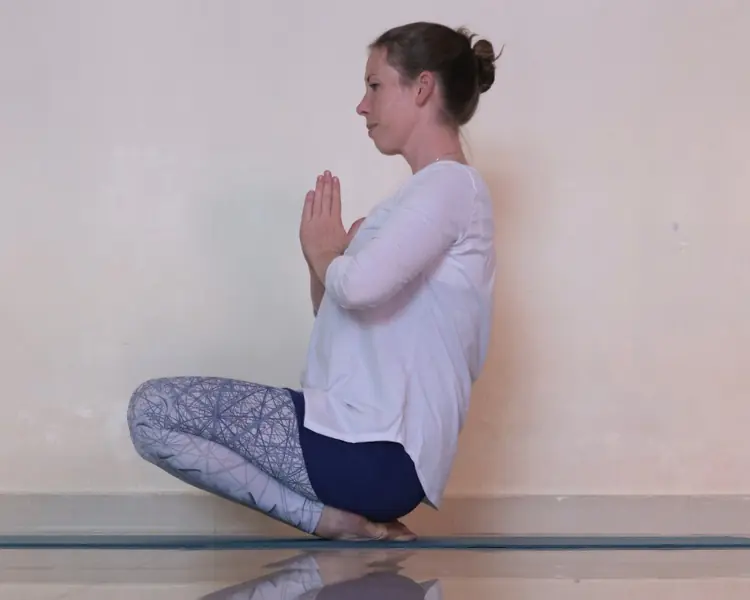
Instructions: Sit on your heels with your feet together. Lean back, placing your hands on the floor behind you, and gently lift your knees. You can place a bolster under the knees if you find the pressure too much.
Hold: 1-3 minutes.
Benefits: Stretches the ankles and feet.
3. Toe Squat
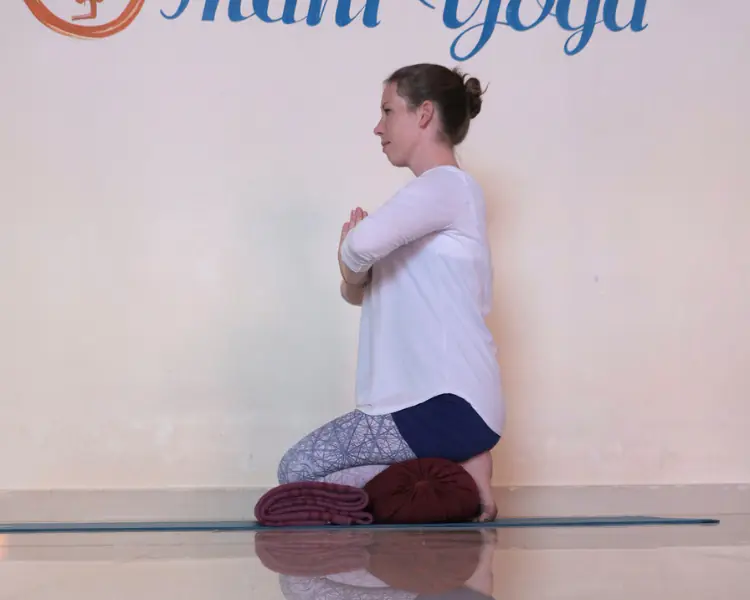
Instructions: Sit on your heels with your toes tucked under. Sit back on your heels to stretch the soles of your feet. You can place a bolster under the knees if you find the pressure too much.
Hold: 1-3 minutes.
Benefits: Stretches the toes and the soles of the feet.
4. Banana Pose (Bananasana)
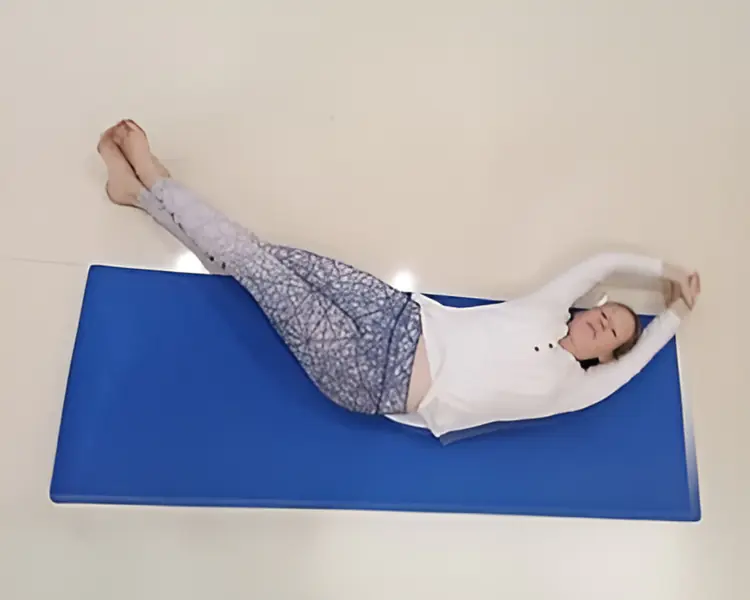
Instructions: Lie on your back. Walk your feet and hands to the right to form a crescent shape with your body. Keep your hips and shoulders on the floor.
Hold: 3-5 minutes each side.
Benefits: Stretches the side body, opens the ribcage.
5. Deer Pose
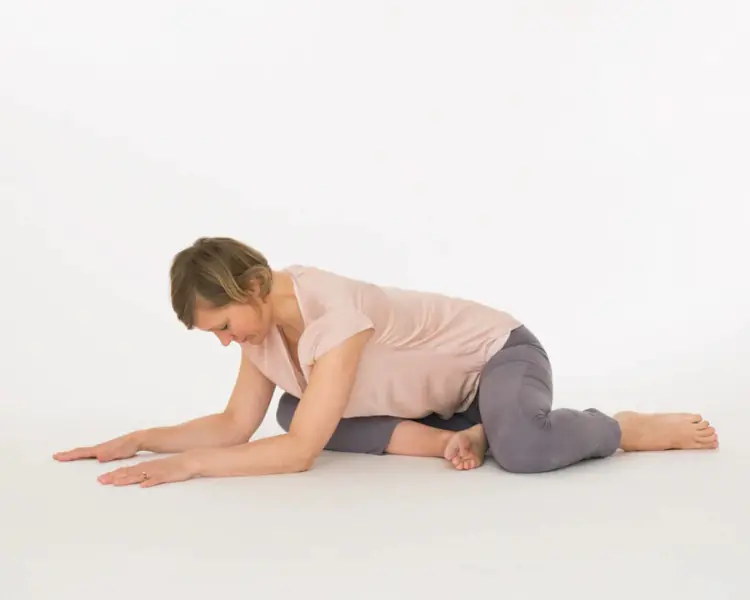
Instructions: Sit with your right shin in front of you and left leg bent behind you. Lean forward slightly. If you struggle to keep the back hip on the floor, support it with a blanket or block.
Hold: 3-5 minutes each side.
Benefits: Opens the hips and relieves tension in the lower back.
6. Butterfly Pose (Baddha Konasana)
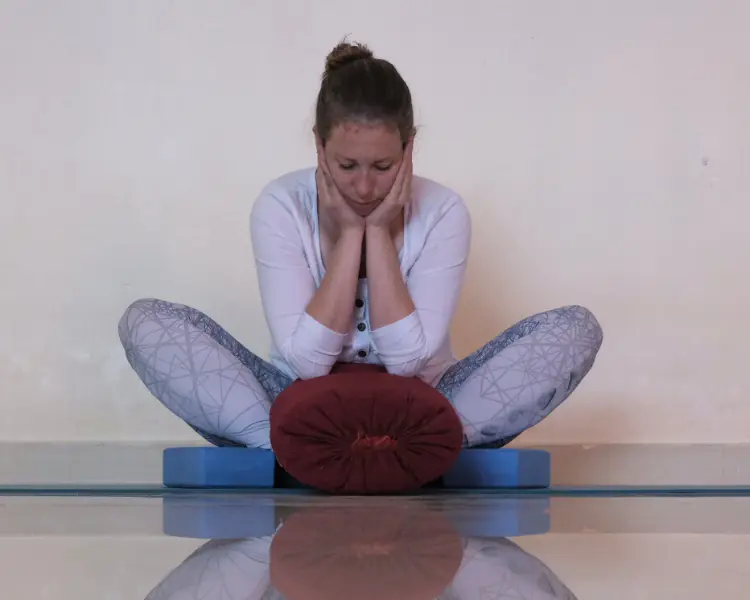
Instructions: Sit with your feet together and knees falling out to the sides. Lean forward gently, allowing your spine to round. Support the knees with blocks or bolsters, you can also rest the head on a block or bolster.
Hold: 3-5 minutes.
Benefits: Stretches the inner thighs and groin.
7. Half Butterfly Pose (Ardha Baddha Konasana)
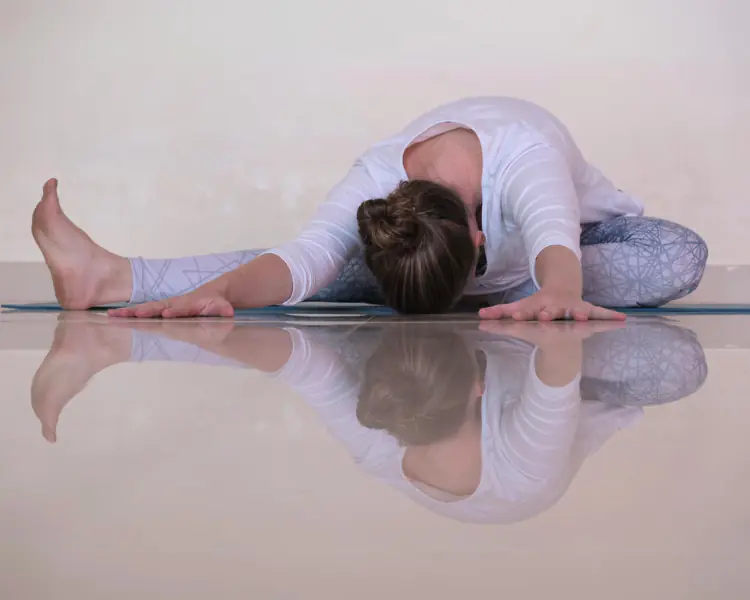
Instructions: Sit with your right leg extended and your left foot against your right inner thigh. Fold forward over the extended leg. You may fold forwards onto a bolster.
Hold: 3-5 minutes each side.
Benefits: Stretches the hamstrings and lower back.
8. Cat Pulling Its Tail
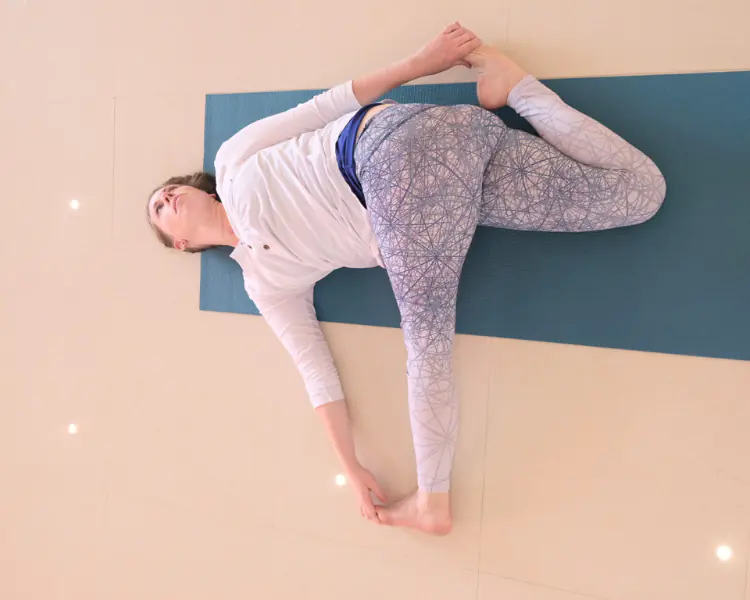
Instructions: Lie on your right side. Bend your left knee and grab your left foot with your right hand, creating a gentle twist in your spine. If this is to intense, just catch one foot or use a belt to grab the front foot.
Hold: 3-5 minutes each side.
Benefits: Stretches the quadriceps and spine.
9. Caterpillar Pose (Paschimottanasana)
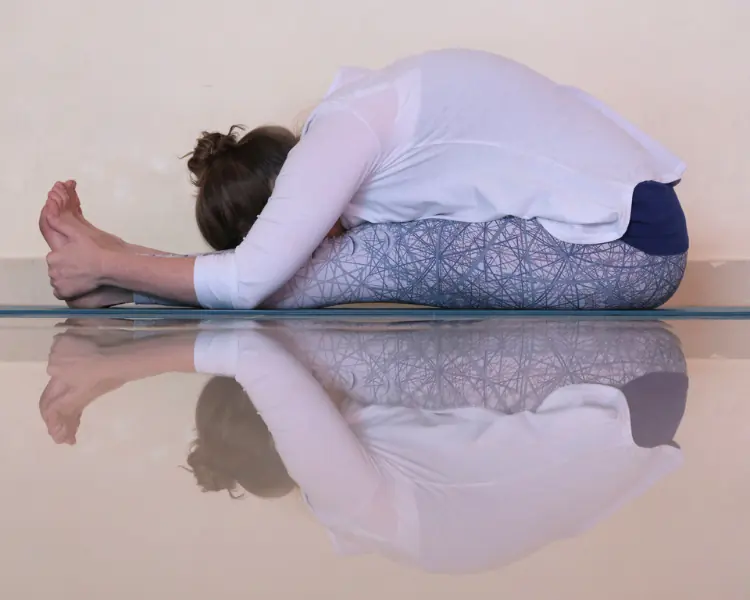
Instructions: Sit with your legs extended straight in front of you. Fold forward from your hips, letting your spine round and head drop. Fold forward onto a bolster if you wish.
Hold: 3-5 minutes.
Benefits: Stretches the spine and hamstrings.
10. Child’s Pose (Balasana)
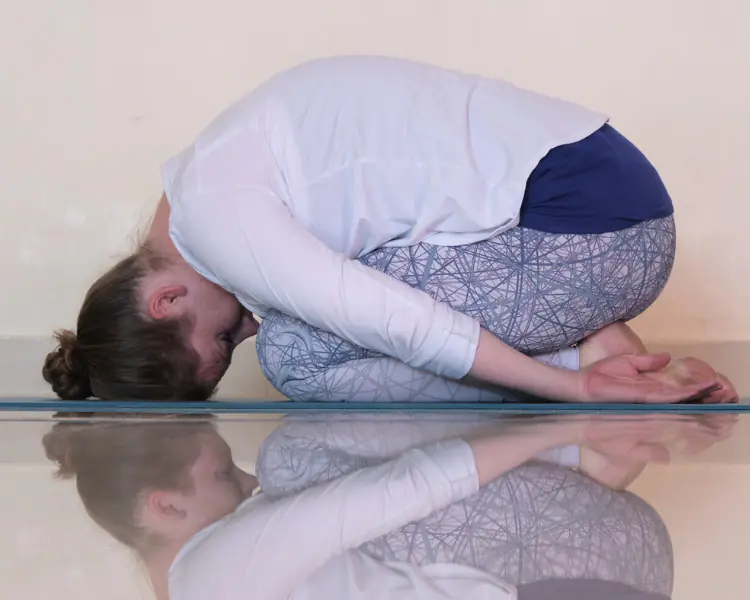
Instructions: Kneel on the mat, bringing your big toes together and knees apart. Sit back on your heels and extend your arms forward, resting your forehead on the mat. Fold forward onto a bolster if you wish.
Hold: 3-5 minutes.
Benefits: Stretches the hips, thighs, and ankles, calms the mind.
11. Dangling Pose (Uttanasana)
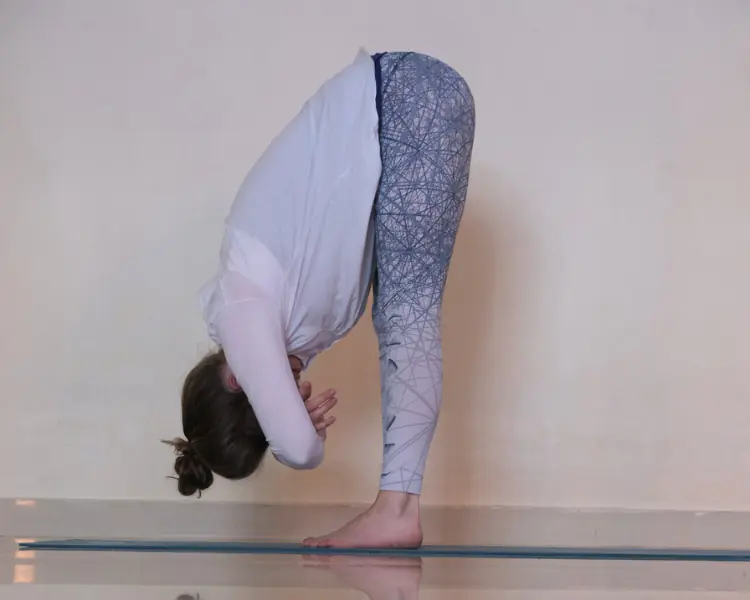
Instructions: Stand with your feet hip-width apart. Hinge at your hips and let your upper body drape forward. If this is too much for the back, hips or blood pressure, then hold onto a chair or press the hands into a wall. Hold your elbows for added support.
Hold: 3-5 minutes.
Benefits: Decompresses the spine, stretches the hamstrings.
12. Dragon Pose
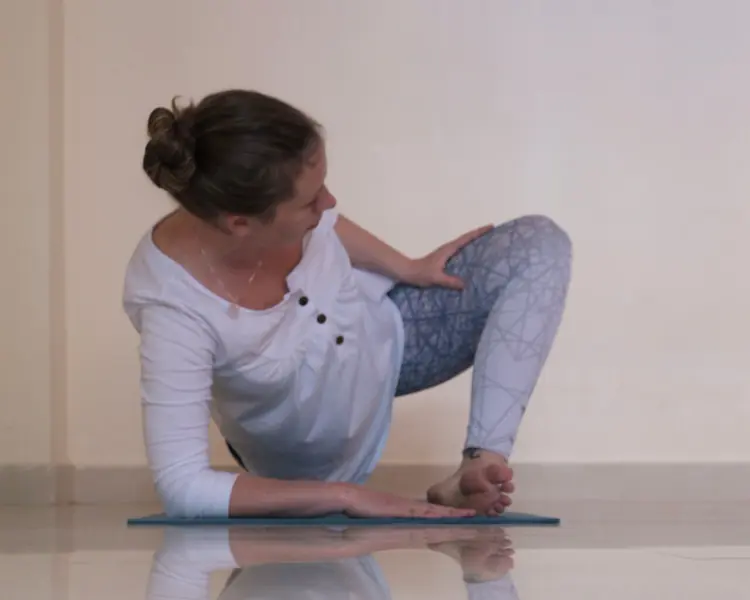
Instructions: Start in a low lunge with your right foot forward. Lower your left knee to the mat. Shift your hips forward and down. You may place the hands-on blocks if you wish.
Hold: 3-5 minutes each side.
Benefits: Opens the hips and hip flexors.
13. Frog Pose (Mandukasana)
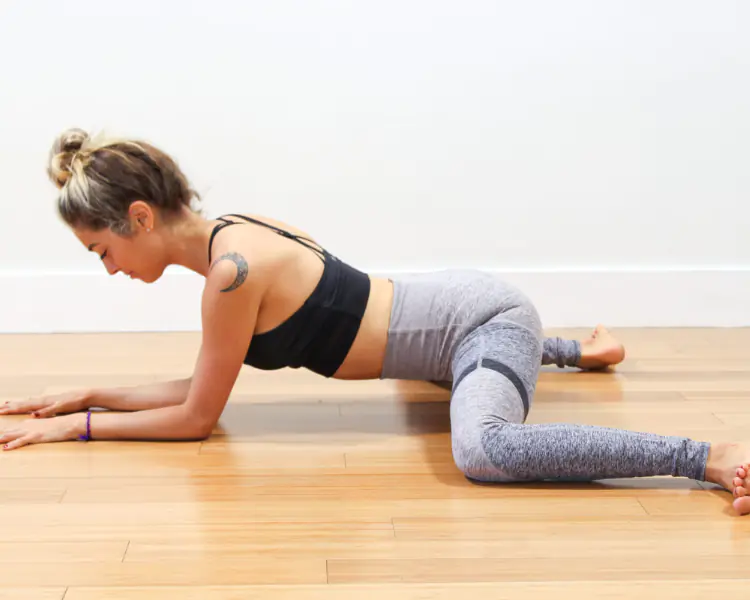
Instructions: Start on all fours. Slide your knees apart, keeping your ankles in line with your knees. Lower your chest and hips towards the mat. You may lower down onto a bolster or two if you want.
Hold: 3-5 minutes.
Benefits: Stretches the inner thighs and groin.
14. Reclining Twist (Jathara Parivartanasana)
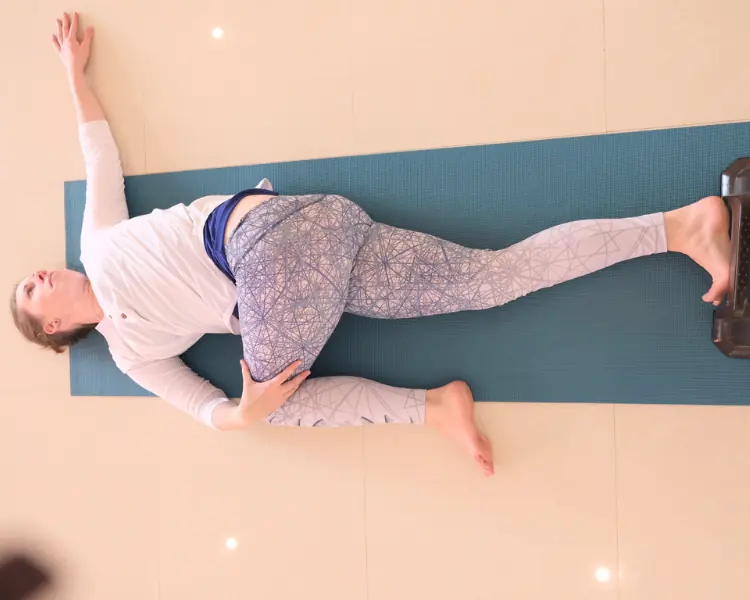
Instructions: Lie on your back and bring your knees to your chest. Lower your knees to the right side, extending your arms out to the sides. Bring the top knee onto a bolster if you want.
Hold: 3-5 minutes each side.
Benefits: Stretches the spine and shoulders.
15. Saddle Pose (Supta Virasana)
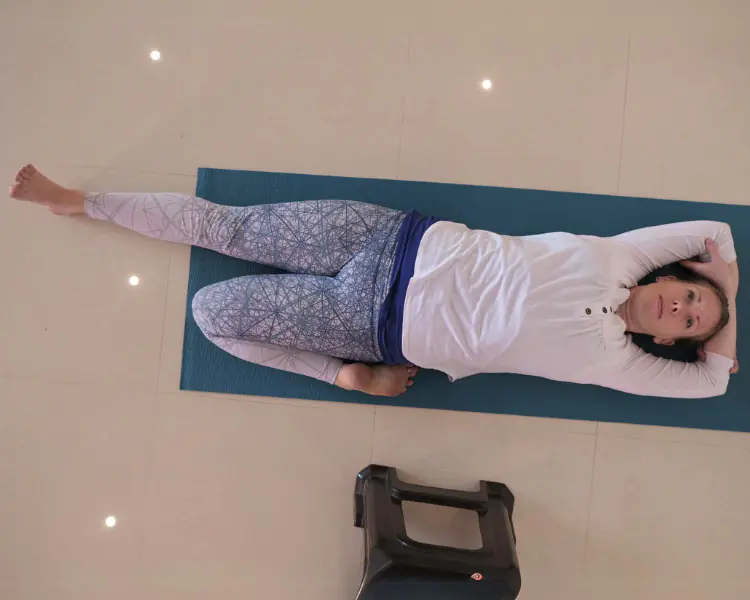
Instructions: Sit on your heels with your knees bent and legs together. Lean back and lower your upper body to the mat. This is an intense pose; you may sit on a block and lower back onto two or more carefully stacked bolsters.
Hold: 3-5 minutes.
Benefits: Stretches the quadriceps and hip flexors.
16. Shoelace Pose (Gomukhasana)
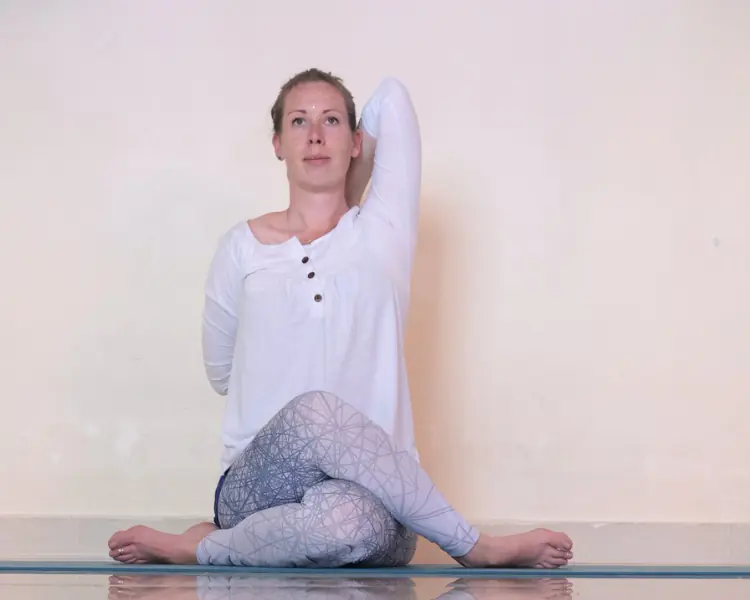
Instructions: Sit with your legs extended. Bend your right knee and place your right foot by your left hip. Cross your left leg over your right, stacking your knees. You may sit on height such as a block.
Hold: 3-5 minutes each side.
Benefits: Opens the hips and stretches the outer thighs.
17. Snail Pose (Karṇapīḍāsana)
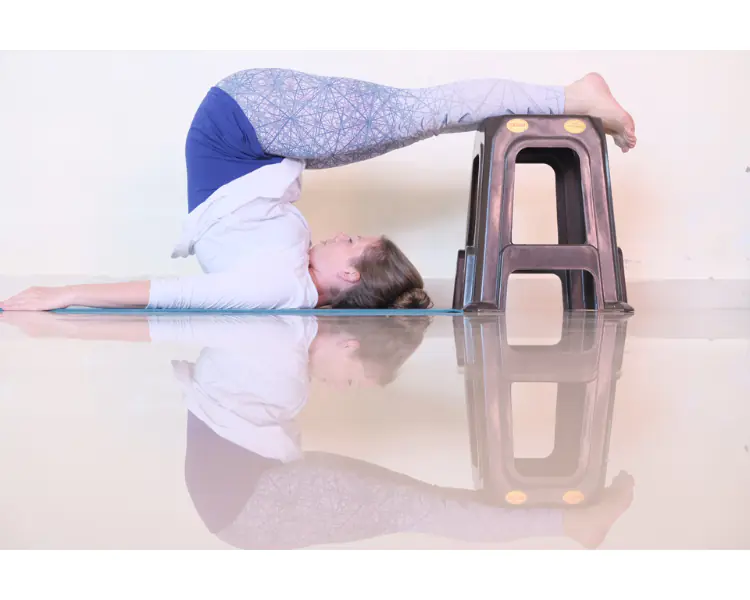
Instructions: Lie on your back and lift your legs overhead, bringing your toes to the floor behind your head. Bend your knees and place them next to your ears. You can place a small chair under the feet to raise them and take away pressure from the back.
Hold: 3-5 minutes.
Benefits: Stretches the spine and shoulders, calms the mind.
18. Sphinx Pose
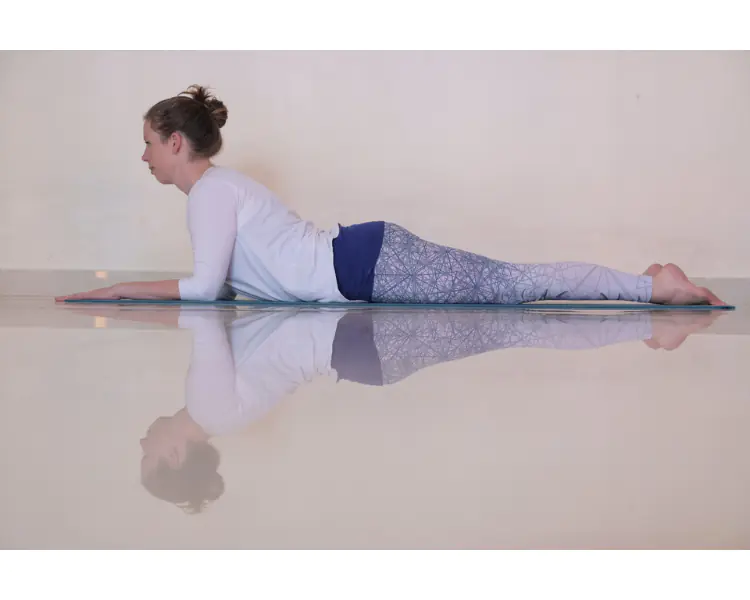
Instructions: Lie on your stomach with your legs extended. Prop yourself up on your forearms with elbows under your shoulders. You may take a bolster under the armpits if you wish for more support.
Hold: 3-5 minutes.
Benefits: Opens the chest and stretches the spine.
19. Seal Pose
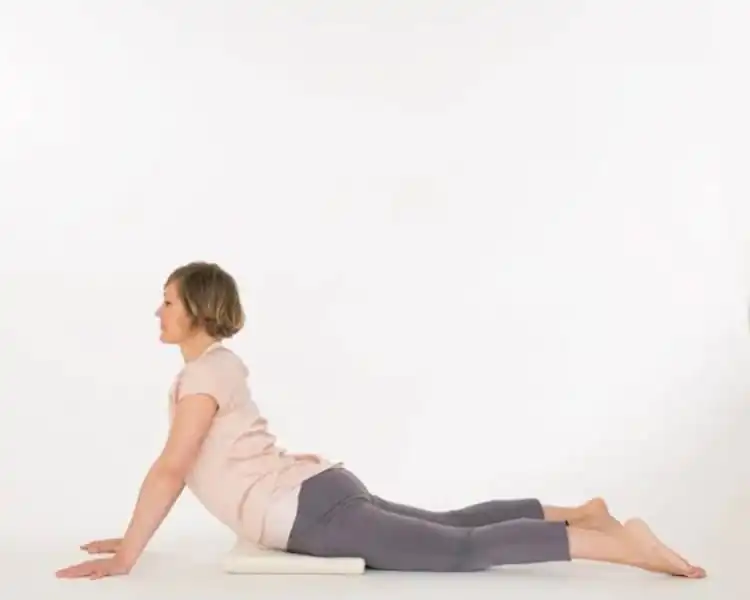
Instructions: From Sphinx Pose, extend your arms in front of you and lift your chest higher.
Hold: 3-5 minutes. As with seal you can use a bolster.
Benefits: Deepens the stretch in the spine and chest.
20. Square Pose (Agnistambhasana)
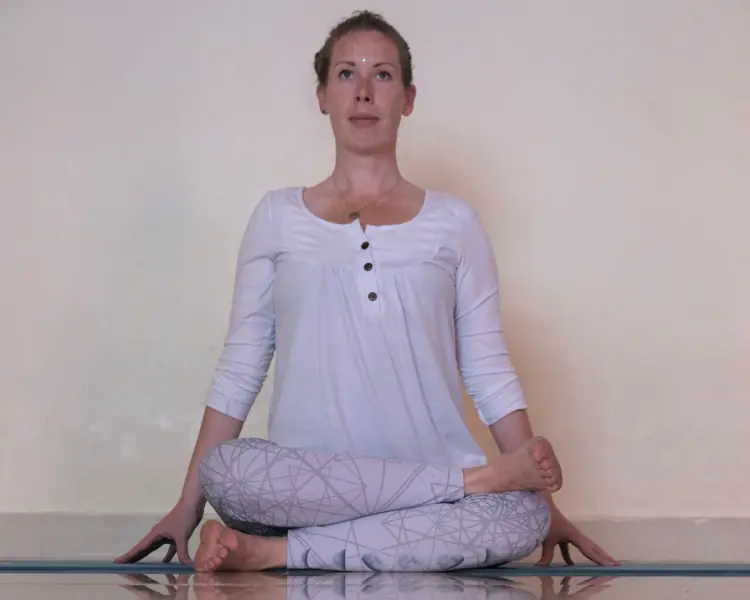
Instructions: Sit with your legs bent and right shin stacked on top of the left shin, creating a triangle shape with your legs. Lean forward gently. You may place blankets or blocks under the knees balancing the angles of the pose if the hips are stiff.
Hold: 3-5 minutes each side.
Benefits: Stretches the hips and outer thighs.
21. Squat (Malasana)
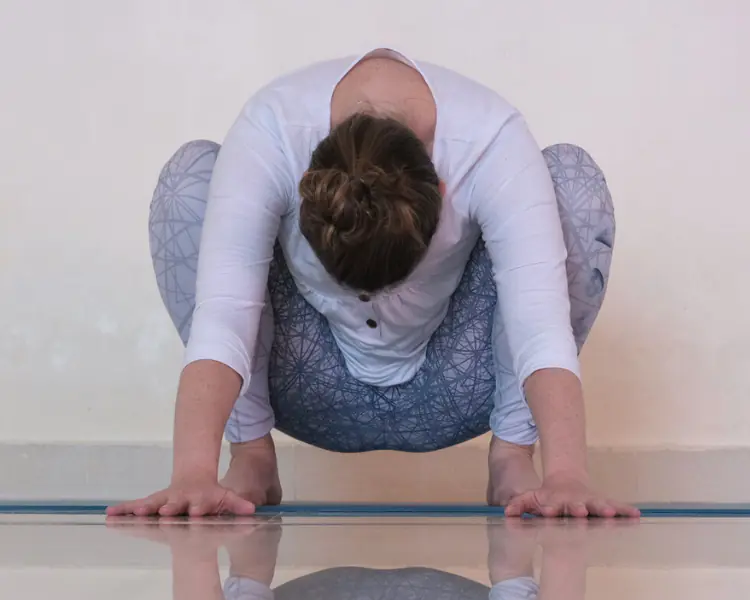
Instructions: Stand with your feet hip-width apart. Bend your knees and lower your hips into a squat, bringing your hands together in front of your chest. You may sit on a block to assist your balance.
Hold: 3-5 minutes.
Benefits: Opens the hips and stretches the lower back.
22. Straddle Pose (Upavistha Konasana)
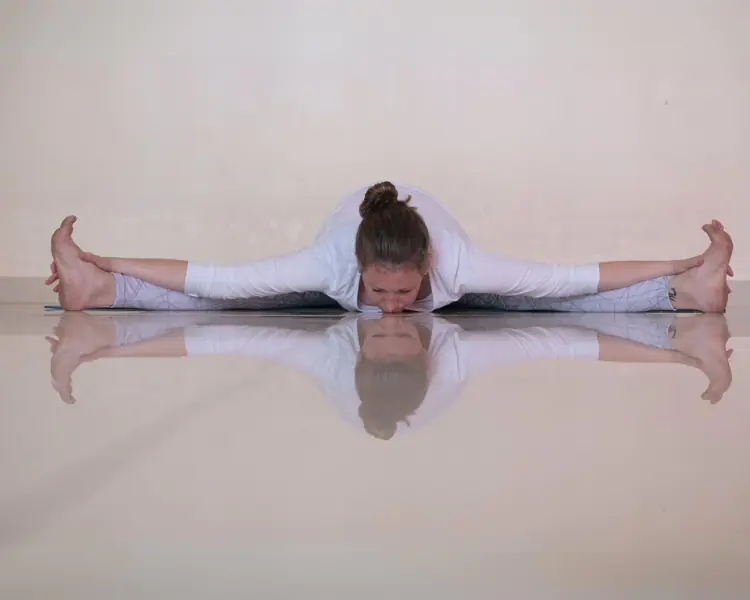
Instructions: Sit with your legs extended wide apart. Lean forward from your hips, letting your spine round. You may fold forward onto a bolster or two.
Hold: 3-5 minutes.
Benefits: Stretches the inner thighs and hamstrings.
23. Swan/Sleeping Swan Pose (Kapotasana)
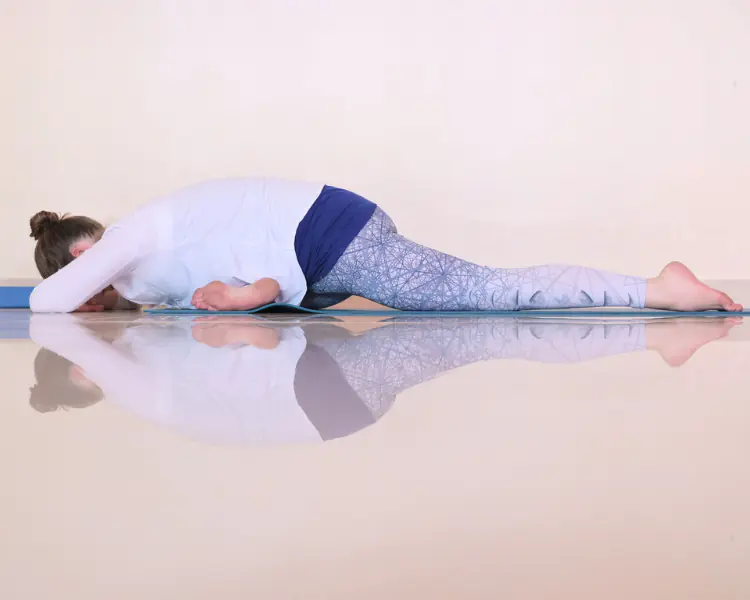
Instructions: Start in a low lunge with your right foot forward. Slide your right knee toward your right wrist and your right foot toward your left wrist. Extend your left leg back and lower your hips. You can take the height of a block or blanket under the bent hip to balance the hips out if needed.
Hold: 3-5 minutes each side.
Benefits: Opens the hips and stretches the thighs.
24. Supported Bridge Pose (Setu Bandhasana)
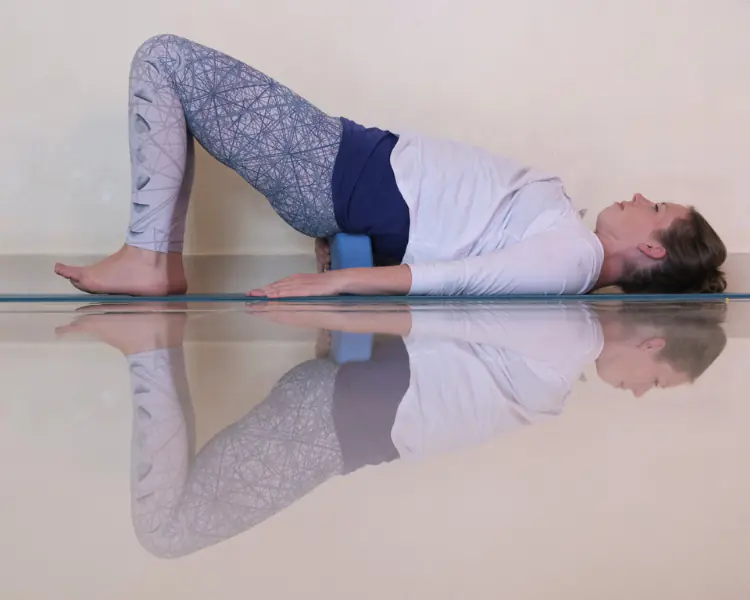
Instructions: Lie on your back with your knees bent and feet on the mat. Lift your hips and place a block under your sacrum.
Hold: 3-5 minutes.
Benefits: Opens the chest and stretches the spine.
25. Wind Release Pose (Pawanmuktasana)
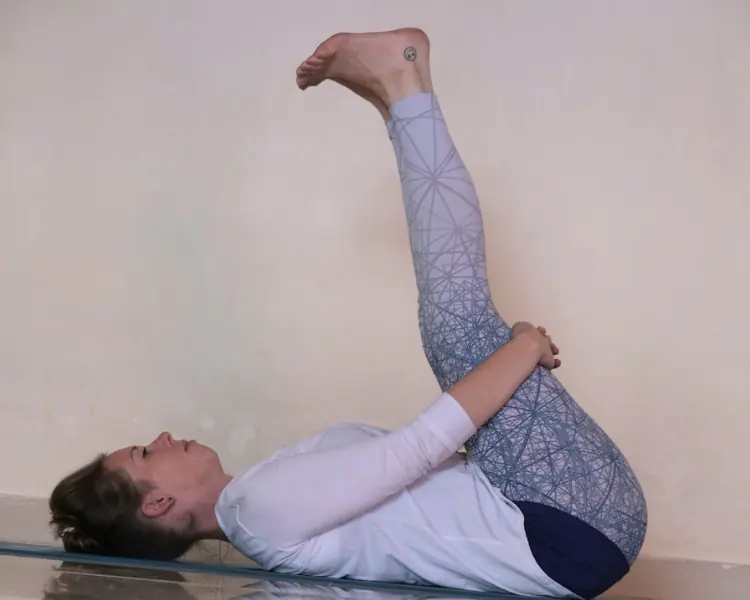
Instructions: Lie on your back and bring your knees to your chest. Wrap your arms around your shins and gently rock side to side. Widen the knees if needed. Hold: 1-3 minutes. Benefits: Releases tension in the lower back and massages the digestive organs.
Tips for an Effective Yin Yoga Practice
Find Your Edge: Move into each pose slowly and mindfully, finding the point where you feel a moderate stretch but not pain. This is your edge.
Stillness: Once in the pose, remain as still as possible. This allows the muscles to relax and the deeper tissues to be targeted.
Time: Yin Yoga poses are typically held for 3-5 minutes, but you can adjust the time based on your comfort level.
Breath: Focus on slow, deep breaths to help release tension and stay present in the moment.
Props: Use props such as blocks, bolsters, and blankets to support your body and enhance comfort in each pose.
By incorporating these Yin Yoga poses into your routine, you can enjoy their physical and mental benefits, fostering a deeper connection with your body and breath. Remember, the key to Yin Yoga is patience and listening to your body’s signals. Enjoy your practice and the serene journey inward!
